Thursday 30 June 2011

One Stamp, 6 different ways.. Pt 1

Hi Everyone.. Well, we all have them, but how often to you actually use the same stamp more than once? Obviously, some you will use more than others.So, over the next few posts I wanted to share with you some projects I have made using the same image. But, by changing the colours used can make each project so individual...
So, here we go with the first one...Now I know they are not traditional Christmas colours, but I'm in a bit of a Monochromatic, non Christmassy colour mode at the moment!Firstly, I stamped my image using Tuxedo Black Memento Ink and coloured it in using my Copic Pens.. Of course the image had to have a glaze of Glossy Accents to bring it to life!I then cut out the image using the largest shape from the Standard Circles Small set of Nesties, I also cut a shape from the co ordinating set of Scalloped Circles small in some Copper coloured Mirror card. Again, I used the largest sized Scallop.And then matt and layered the two shapes together..I then punched a border in the Copper Mirror card using the Martha Stewart Footlights Border Punch (M42-40087).This strip and the stamped image were attached to my base card.
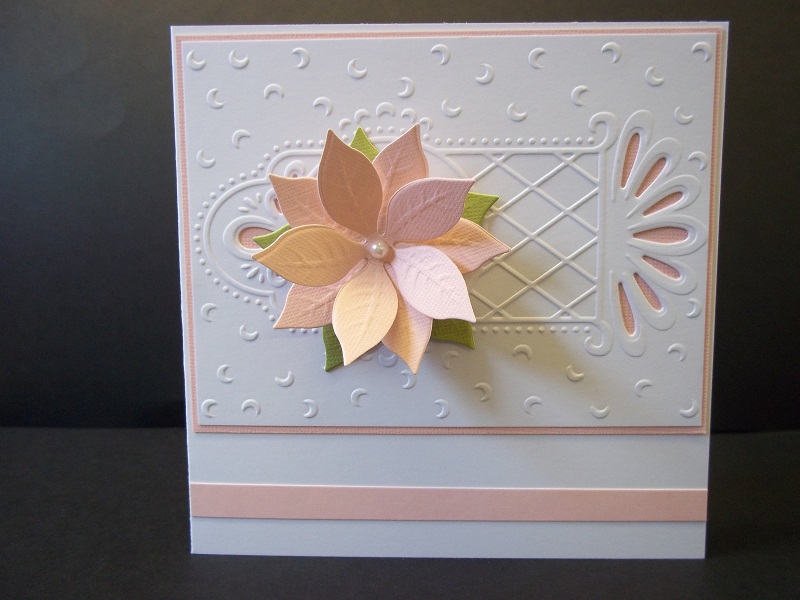
Next, I cut and embossed some leaf shapes using the Spellbinders Foliage Die (S4-328).. Just to point out, this set of dies has 6 different leaf shapes. One of which is a single leaf and another which is the same leaf shape but on a branch.To save myself some time, as I needed several of the small leaf shapes, I cut out several of the branch shapes and just snipped the leaves off of the branch.. Five leaves for the effort of cutting one!! Don't ask my why they look Pink in this picture; they were Beige when I cut them out..I attached the leaves to some pre made Prima Flowers (#548186) which I had also added a few Pine Leaves to, which had been punched out using the Martha Stewart Pine Leaf Punchand then applied them to the card to complete the project...So, that's the first one down, check back soon for part two.
Thanks for checking us out.
See you soon.

Tuesday 28 June 2011

Rudi!!!

Hi Blogland... I hope you all had a good weekend? And I hope that those who could stand it here in the UK enjoyed the mini heat wave we have just had!! I must say, that 34 degrees c is not my idea of summer weather here in the UK. I did however drag myself into the garden on Monday and have turned a resounding shade of Burnt Sienna, or more appropriately, Burnt Andy!!
Anyway, weather report over and done with how's about some crafting!!?
When I came in to work this morning I was greeted with an e:mail from Marianne... Yes Marianne herself from Marianne Creatables!!
I had sent the projects I had made a couple of posts ago to her as part of her "Designer for a Day" project..And she sent this back to me... Which I am going to proudly display on my little blog... She said I was the first one in the UK to receive it! Now there's an honour!!So, over the moon with this little award, and seeing as her July Die releases are now in stock I decided to put a couple of them to good use!!I started off but cutting out and embossing the Rudolph (LR0179) Die through the Cuttlebug using some Copper coloured Mirror card..
The image cuts and embosses very well, but I was a little put off that the eye gets cut out too, It makes "Rudi" look a little bit evil to me! Could this be where the term "No Eye Deer" comes from?? (Laugh if you feel you need too, but I suspect there may be a few groans).. Sorry, just my sense of humour!!Anyway, as my first image had left the eye in the die I decided to leave it there and not pop it out as I would normally do,this was so that the next cuts would emboss the eye as opposed to cut it out!!.. Anyone getting squeamish yet!!?Next, I cut out the Sleigh (LR0178) image..And applied the Reindeer and Sleigh to some Night Sky printed Acetate which was mounted onto a side folding DL card.I then took the Martha StewartGifts Deep Edger Punch (M42-70014) and punched into some Gold card stock,cutting along the bottom of the Gift images to release them from the border and make them into individual gifts!These were then added to the Sleigh with some Silicone Gel..And what does every self respecting lead Reindeer need? A Red nose of course! It is Rudolph after all!!I was thinking about adding some reigns for the Reindeer, but most things that I tried just spoilt the effect in my opinion, so best left alone I think!!
Anyway, thanks for checking us out and see you soon.
Andy.

Friday 24 June 2011

Contemporay Christmas

Hey Bloggers... Today I thought I'd share with you something a little bit different than the "normal" Christmas colours in these cards.. A bit more contemporary if you will...It's fun to ring the changes a bit I think, although notice I have not put a sentiment on these cards as yet as I'm still not 100% convinced that they say Christmas to me! And also, you never know, I may need an emergency Birthday card at some point before the end of the year..This is one of the reasons I love this "Poinsettia" Die so much. It is very versatile and doesn’t necessarily have to be used as intended!!We had some Silhouette card in recently,and you know me,I had to make one in each colour...!
Very simple, very effective...
Thanks for checking us out.
See you soon.
Andy..

Tuesday 21 June 2011

5 for the price of 1!!

Hey Blogland... Well, after a brief respite from Christmas so that I could post my Dad's Father's Day card, I'm back on it!!And here is a selection I made in a very short space of time.. Once I had come up with the idea I churned them out in no time at all and in as many colours as I had to hand!!Using the Marianne Creatables Poinsettia (LR0122) I cut out 2 shapes in White card stock and 1 in Green.Layering them all together and off setting them slightly, adding a gem in the middle as a focus point...I then embossed a piece of White card stock using the Marianne Designables Embossing Folder called Classic (DS0911).This was matt and layered onto the same Green card as I had used for my Poinsettia leaves so as to keep the theme running through the project.I then mounted my completed Poinsettia on to the embossed imageand then added the two elements to my base card to which I had already added a small strip of the Green card to..
Quick, simple and effect!! It says "Christmas" to me! How about you??
So, that one done and out of the way, it was only a hop, skip and a jump to make a few more samples...Something a little more contemporary!!And something a little more traditional!Then back to contemporaryfor my last couple...I hope that these simple examples give you some inspo to get your Crimbo crafting under way, if you haven't started already that is!!
Thanks for checking us out & see you soon.
Andy..

Sunday 19 June 2011

Happy Father's Day!!

Hi Blogland... Well, today's the day we celebrate those great guy's in our lives! Our Dad's... I had several ideas of the kind of card I wanted to make for pop'sand "eventually" settled on this one!
It's grunge(ish), it's vintage, it's distressed, it's Steam Punk.. It's all the things I enjoy playing with.. It's me in a card really!! Can't get much more personal than that can you?..I started off by Brayering a White piece of card stock with some Latte (Beige) Adirondak Ink.And then embossed the piece of card through the Cuttlebug Machine using the Pocket Watch Embossing Folder from the Tim Holtz Textured Fades Embossing Folder Set Pocket Watch & Steampunk.I then brayered over the image using Slate Adirondak Ink to highlight the embossing.Then matted it onto some Slate coloured Mirror card.I got the idea for this card from my last Brayering lesson, a day spent with some great crafter's who were not afraid to get a little bit mucky!! Hands covered in Ink, and in some cases forearms and up to the elbow's too, eh Emma!!For the next part of the project I Brayered another piece of White card stock, again using the Slate coloured Ink. I also stamped my image using the same Ink, tone on tone can look so effective and I think that if I had used a Black Ink it would have been too much of a contrast! This train image is from a stamp set by Sam Poole... A great UK artist with a great style.. Take a look at her Blog for some great inspo...I also matted the Train image with some Slate Mirror card to tie the theme with the Pocket Watch image.On one of Sam's (Sam, get me using her first name! like I know her personally! Don't you just find that you do that with the crafting elite! Sam, Tim, Martha, Dawn.. lol)! Anyway, on one of Sam's other set's of Stamps is this Ironic Sentiment.. Which sums me up to a tee, and many other's no doubt! Again, this was stamped using the Slate Ink onto a piece of card stock which had also been coloured with it.. Then matted onto some more mirror card.
I put these images to one side so that I could get on with making my base card.I had a piece of this Clock backing paper left over from another project. As it is White it would not work with this project,so I coloured it using the Antique Linen Distress Stain, going over the Clock faces a second time to give a contrast to the background. Once the backing paper was dry, (it doesn't take long!)I cut it to size and added it to a prepared Easel card.Adding my embossed and stamped images to the front.
For the stopper of the Easel card I wanted to keep the Steampunk, Vintage theme going..So, I cut out some shapes using the Sprightly Sprockets Die from Spellbinders!These shapes were cut from some new Mirror card we now have in.. Now, you know I use a lot of Mirror card on my projects! I also feel that I waste a lot of Mirror card!! A little while a go I found a whole box of Mirror card off cuts (and shamefully some whole sheets too!!). I totted it up and there was £75 (US$120) worth of Mirror card in the box!! ouch!! I have put it to good use now though!
So I think that this new Quad cut Mirror card is going to help me no end.. Sometimes I either only need a little bit, or certainly don't need a whole sheet.. So I can now be a little bit more economical with it! Why didn't they think of this earlier!! Lesson learnt!Once the shapes were cut out I applied them to the bottom of my Easel card to finish the project off...Ta Da!!! Have a great day all you Dad's out there and thanks for checking us out..
See you soon.
Andy..