Friday 23 July 2010

Amazing!!!!

Hi Everyone. Today I wanted to share with you something a little bit different.
Hopefully most of you will know that here at Pinnacle Crafts we try to offer you an eclectic range of techniques to use in your crafting projects. You will find everything from Cuttlebug to Cricut, from Card Making to Scrapbooking, from Peel Offs to Shaving Foam.., OK, we don't actually sell Shaving Foam but we have shown you how to use it.Well today's offering is one of Joanne's, dare I say it!! Yes I dare! "MASTERPIECES" using Parchment...
Joanne is our qualified Pergamano and Parchcraft Australia (PCA) tutor. She also happens to be my (older) Sister, and when you have someone with as much artistic talent to look up to, it's bound to rub off somewhere.. That's me looking up to her that is, not t'other way around... yeah, yeah I can make a Cricut work,but this!!! mmm I think not..
The detail in all of her Parchment work is beyond words...Check out the Butterfly on the front of the shoe, all hand drawn and embossed..as is the detail on the side of the shoe...Now most people would struggle with making a bow out of ribbon!, but Parchment!! Awesome!
Joanne has another one of her all day workshops tomorrow, and it's testament to her amazing work that it is another sell out!! Enjoy ladies...
Thanks for checking us out.
See you soon.
Andy.

Monday 19 July 2010

Christmas in July!!

Hi Blogland. As every crafter knows, if you make your own Christmas cards, it's best to start early!! How many times have you found yourselves rushing all of your cards at the last minute in November and thinking, next year I'm going to make at least one a week... mmmm Me too!..So, here at Pinnacles we have just had our annual early start to Christmasto inspire those who wish to get going...
We converted our workroom into a winter wonderland of crafting goodies, lots of stamps, punches, papers, peel offs, decoupage and all sorts of stash were available..As well as lotsand lots andlots of ideas and inspo to get the creative juices flowing,which also meant plenty of opportunities to take pictures too. We know only too well that you get an idea, and as soon as you leave the shop it goes completely out of your head, so we actively encourage you to take pictures of our samples.. We take it as a compliment!
And of course we could not have held this event alone! Our heartfelf thanks (yet again!!) go out to Lin, Lyn & Irene whos help, crafting knowledge, love & friendship make all that we do here at Pinnacles just that bit easier for us all. Thanks Team Pinnacle.. xxxx So today, I wanted to share a couple of our samples from the event with you.
In recent posts you will have noticed that I have been a little bit obsessed with the step card.. Well, today's project is no different!!!lol...
If you want the instructions on how to make the template in both metric & imperial (:o)for Toni) then take a look here..
Now, you know I'm a big user of plain mirror card on my projects! Today's projects incorporate patterned mirror card too...
So here goes...I scored and cut the basic template shape using Light Pink mirror card, I then cut panels from some complementary patterned mirror card to be placed over the panels of the base card which were going to be seen..I cut out two shapes from Nestabilities Labels Twelve, one in Pink Mirror card and one in plain Pink card stock.And stamped my sentiment using Victorian Velvet Distress Ink,mounted the two images togetherand then mounted them onto my project.I punched a flower from Light Green Mirror card and one from Light Pink using the Martha Stewart Large Pop Up Water Lily Punch and also a flower in Pink Mirror card using the Medium Martha Stewart Water Lily Punchand layered them all together adding some Pink Gems in the centre.These were added to the card to complete the project...See, very simple, but also very effective! The card that is, not me!!
So, one in Pink for the Girls,
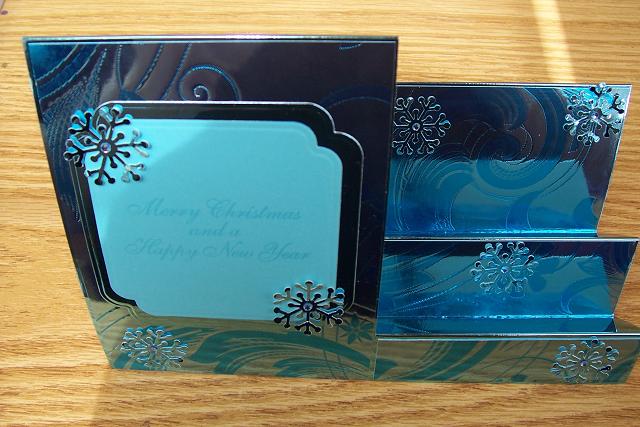
Here's one in Blue for the Boy's!!
Exactly the same process,but this time I used a Punch from the Martha Stewart Stamp and Punch Set called Polar Snowflake..Well I hope today's post has given you some ideas or at least the get up and go to go through your crafting stash and get crafting for Christmas... It is only 159 days to go you know!!!...
Thanks for checking us out..
See you soon
Andy..

Friday 16 July 2010

T'is the season....

to get crafty!! Hi Everyone, How are things with you today? Well I hope? Today I am going to share with you one of our samples from Our Christmas in July event which starts tomorrow here at Pinnacle Crafts.
In my last few posts I have shared with you ideas using the Summer Bloom range from Do Crafts.. Summer Bloom in packed full of items for Summer,but now we slip seamlessly into Winter... albeit only for a couple of day's...I stamped an image from a set of clear stamps from the Penelope & Percy range of products using Tuxedo Black Momento Ink.I then coloured the image in using a selection of Copic Pens and went over the whole image with some Glossy Accents, adding a little bit of Frosted Lace Stickles to the area beneath the character. I then put it to one side to dry.
Once it was dry I was ready to cut it out. I used a Nestabilitie Circle and a Cuttlebug.Take a circle that will fit your image and place it onto your image with a Cuttlebug "A" plate and "C" plate underneath it.Place a Cuttlebug "B" plate on top and pass through your machine.I then cut out a larger circle using a Chocolate Brown card stockand stuck the two circles together.Adding a few Red Gem Stones as berries to really make the image sparkle, it is a Christmas card after all!!
I then cut two even larger circles,one in Chocolate Brownand one in White.I cut the White circle in halfand then took my Martha Stewart Drippy Goo punchand punched along the straight edge and applied it to the Brown circle..I think it looks like cream running down a Christmas Pudding! I just love finding new ways to use a product other than perhaps it's intended use, don't you?!I cut out an embossed holly leaf from some Green card stockand applied it to the project with some Red Gem Stones.I took some Red card stockand using the Martha Stewart "Joy" border punchI punched into all four sides.Applied this to my base card.Finally adding the other two images on top.
So, there you have it, the first Crimbo card of the year! Plenty more from where that came from though! So if you're coming to the Christmas in July Weekend, see you there, if not I'll be posting some more ideas very soon.
Thanks for checking us out, see you soon..
Andy.

Tuesday 13 July 2010

Upside down & inside out..

Hey Blogland! In the last couple of posts I've shared with you a different type of fold, which I just love and have made lots of samples now using it!However, I thought I'd ring the changes a bit with today's offering!! By way of turning the thing upside down and inside out.. hence the title of today's post!Normally with this type of fold you would fold the card like this!But what about turning it over?? It folds just the same, but you get a whole different area to play with!I prepared some decoupage from the Summer Bloom collection, this is die cut decoupage so it took no time at all to piece together! My kinda decoupage! (Lucy, can I tempt you?)I took a complementary sheet of 8" x 8" backing paper, again from Summer Bloom,and mounted the decoupage onto it's mirror image. As the printed image on the paper was at an angle, (on the wonk!) it was going to prove difficult to cut a rectangle from it so that I could use it as a panel on the back of the card!So I took my base card and laid it over the imageand drew round it as a template. This way I was sure to get the whole of the image I wantedand also the rectangle I needed.This was mounted on the back panel of my base card.I then added some complementary backing papers (also from the Summer Bloom range) onto the steps of the card. I also punched one of the panels using the Martha Stewart Garden Trellis Deep Edger Punch, I think this punch gives a real garden theme to this project.Finally adding another piece of backing paper to complete the ground work.It's great when some of the work is done for you. Papermania are producing some fantastic borders at the moment, and these little gems were perfect for this project and would also go great with a Summer Scrapbooking layout too as they are 12" in length, and self adhesive too...I chopped mine to size and added them to my project.Completing the whole thing by adding a sentiment from the Summer Bloom Vellum Quote Book which I cut out with a Nestabilities label die.So, something a little bit different for you to try...
I think I have exhausted the Summer Bloom range for now,


as you can see I have been quite busy playing with it..
Thanks for checking us out.
See you soon..
Andy.