Wednesday 26 November 2014

Happy New Year!!!!

Hi folks... No, don't worry... You haven't dropped off to sleep and woken up 37 days later and missed Christmas and New Years Eve 2014 altogether!! It's just the title I've given to today’s post which consists of this week’s Creative Expressions Design Team Project...
It's the last one to feature their Dancing Stamps...., as I have new goodies to play with for my December projects....

So, New Years Day Luncheon che Pinnacles will have a Strictly Come Dancing theme... Well, it is being held at Joanne's (Sister) house... Her house, her rules....

So, we have crackers for the Men in the family

and for the ladies......

And for a very special lady.... Yes, even Holly the Dog has her own New Year Cracker.....

Well, like everyone else in the family, she has a Christmas Day cracker too...
In fact, I think I am all Cream Crackered out!!!
I hope you've enjoyed this Month’s Creative Expressions Design Team Posts and that they have given you some inspo to put your Stamps to good use?
Thanks for checking us out.
See you soon.
Andy.

Wednesday 19 November 2014

First Dance....

Hi folks.. As its Wednesday, it's time for another post for the Creative Expressions Design Team...
I'm still working with the Dance Stamps.. As you may recall in my last post I used them with a Christmas theme? Well today we head in another direction..... Weddings...

Although I've made this project into a card I have no doubt that it would also make a pretty decent Scrapbook page....

I started off by cutting out the Taylored Expressions Die - TE194 MR & MRS.

It has such great detail,

and looks great when backed in a coordinating coloured card stock...

I then stamped my image with Archival Ink and cut it out.
These images are fantastic, although to provide for shading etc some of the lines are not complete, so when the images are cut out they appear to be missing the edges...

If you take an Alcohol Marker and run the nib around the edges then it will "tidy" these up for you.....

It will also soften any "tufty" White edges created when cutting...

Next, I cut and embossed 2 images using the Spellbinders Die - Fleur De Elegance (S4-475)

Attaching one of the images sideways across the back of the "MR & MRS" image..

With the second shape, I cut it in half

so that when it was attached to the back of the "MR & MRS" image lengthways the edges were still visible.

The frame and the dancing couple were then mounted onto my prepared base card which I had embossed using the Creative Expressions/Sue Wilson Large Embossing Folder - Eternity (EF-024).
Adding some Small Circle Dazzlers

and my own Glitter Paste Flower.

I'll share how this was made in a future post... It's pretty effective I hope you'll agree?

So, there you go... If you have a Winter Wedding to go to or even one planned next year, there's another use for your dance stamps....
Thanks for checking us out.
See you soon.
Andy..

Ingredients used:
Taylored Expressions Cutting Plate - MR & Mrs (TE194)
Creative Expressions/Sue Wilson Large Embossing Folder - Eternity (LF-024)
Spellbinders Die - Fleur De Elegance (S4-475)
Cosmic Shimmer Glitter Paste - Aurora Sparkle
Creative Expressions Small Circle Dazzlers
Creative Expressions Stamp - Argentine Tango
Ranger Archival Ink - Black

Wednesday 12 November 2014

The "Two" Days of Christmas....

Hi folks.. No, not a typo... It is the "Two" Days of Christmas.. I don't think my imagination can stretch to the full "Twelve" Days of Christmas just using my Dance Stamps..

That said, I have managed to pluck some inspiration and put them to good use....

We have Ten Lords A-Leaping

and Nine Ladies Dancing...
As there are soooooo many elements to these projects I have decided to use the stamps with some Shrink Plastic.. Using them in the size that they are would have just been too impractical...

I started off by stamping my image onto some White Shrink Plastic using StazOn Ink.

And then roughly cut around my image.

I left a uniformed border just to make it easier, not quite sure I have the patience to cut all the images out exactly!!

When you are ready, it's time to shrink them with your heat gun or pop them into the oven. If you've not tried this technique before, don't panic as they start to shrivel...

They'll usually unravel themselves and shrink to 1/7th of the original size, although you might get a few that stick on themselves... Just a learning curve....

To prep my base card I took some patterned paper and some Glitter Velum.

To adhere one to the other I prefer to spray the card stock with an adhesive as opposed to spraying the Velum. This way, the card stock should soak up any water in the Adhesive and hopefully not show through onto the Velum. Doing it the other way around tends to show the Adhesive on the Velum.

Once you stick the two together, the image from the backing paper should still show through.

I repeated the process for my sentiment.

Then attached my "Leaping Lords"

You can see just how tiny they are compared to the original image...

An upside down bow, idea courtesy of Phil Martin, and the sentiment

And there you go....

I also had a go with some of the other dancing stamps, just because they tied in with the theme...

Quite unusual I grant you,

but a great way to put your stamps to good use...
Thanks for checking us out.
See you soon.
Andy

Ingredients used:

Black StazOn
Shrink Plastic
Creative Expressions Stamps; Quick Step, Top Hat & Tails, Argentine Tango, Salsa, American Smooth
Creative Expressions/Sue Wilson Die - CED3013 Holly Spray


Thursday 6 November 2014

Happy Birthday Sis....

Hi folks... I knew these new Creative Expressions Stamps would come in very handy!!!

Today is Joanne's (Sister) Birthday. And as she is an uber Strictly Come Dancing fan they fit in very well with the card I have made for her....

Happy Birthday Sis, hope you enjoy your day. xxx
Thanks for checking us out and see you soon.
Andy.

Top Hat & Tails Stamp
Step by Step Sentiments Stamp
Small Circle Dazzlers
Tonic Die - 637e Keepsake Frame - Dragonfly
Creative Expressions Large Embossing Folder - Quilted Flower (EF-017)

Wednesday 5 November 2014

Spotlight Dance....

Hi everyone. Well, today is my first post for the Creative Expressions Design Team.... Excited much!!!!
I've been wanting to use some of these goodies since they were launched, primarily because I have a Sister with a Birthday coming up who is an uber Strictly Come Dancing fan... Well, her Birthday isn't until Tomorrow, so I'll wait and share with you the project I have made for her then...

So, shall we make a start?

First of all I made my own mask using a Triangle die.

The Mask (White card stock) was cut to the same size as my base card (Black card stock) would be, you'll see why in a minute...

I applied my Antistatic bag to the Black card stock

and then laid the Mask over the top, so that just the Triangle is visible, this is why the card stock were cut to the same size...

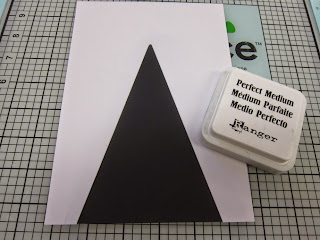
Next, apply Perfect Medium to the Triangle area. The mask should keep the Perfect Medium from going into other areas..

Pay particular attention to the edges so that the Perfect Medium covers the whole area.

Remove the Mask and you should have a Triangular area covered with the Perfect Medium.

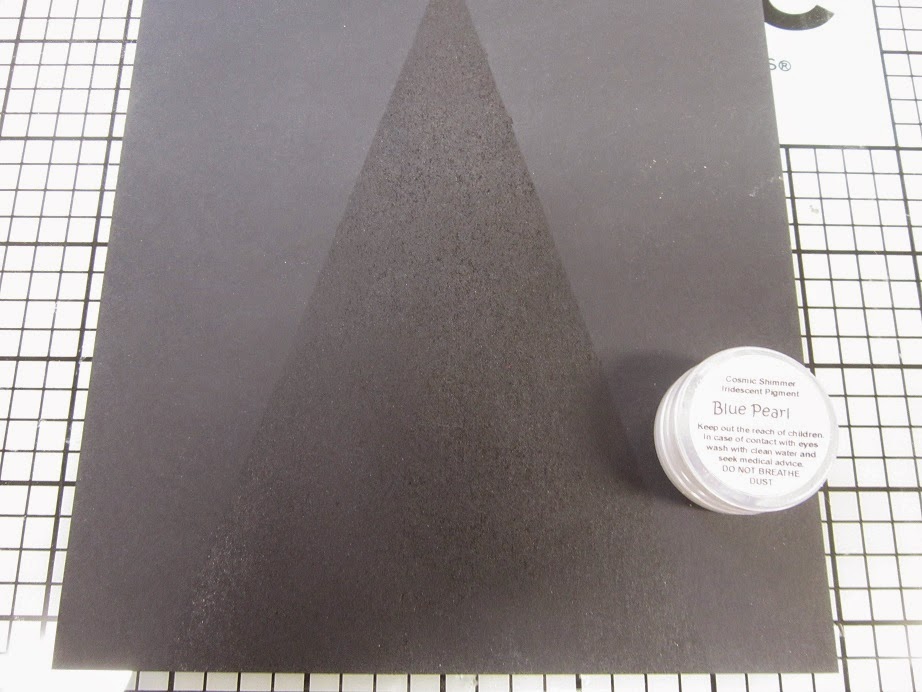
As I've already applied the Antistatic Bag to the Black card stock prior to adding the Perfect Medium I can go straight ahead and add some Mica Powder, I've chosen to use Blue Pearl on this occasion.

Take a brush and add it to the Black card stock.

If you have applied the Antistatic Bag, the Mica "Should" only stick to the Perfect Medium.. Although sometimes sticky fingers can attract the Mica too... Also, if like me you're a bit over zealous with the Perfect Medium then you might get a bit of a wonky edge, but a small pencil rubber should help to tidy things up a little bit. Also, if you miss a little bit, like I have at the top, you can add a little bit of Perfect Medium back onto the project and add some more Mica Powder...
As the Perfect Medium attracts Mica Powder we can use it to our advantage.

Ink up your chosen stamp with the Perfect Medium

and stamp your image..

As I said, Perfect Medium attracts the Mica, so for this additional technique, it's taken the Mica away leaving a silhouette of your image...

One tip I can offer is to clean your stamp straight away, a baby wipe should be sufficient. If you leave it too long it can be hard, but not impossible to take the Mica/Perfect Medium combo off..

Your image and the Mica will need to be set so that sticky fingers don't remove all your hard work! A Cheap generic Hair Spray or Crafter's Companion Spray and Shine will do the job.

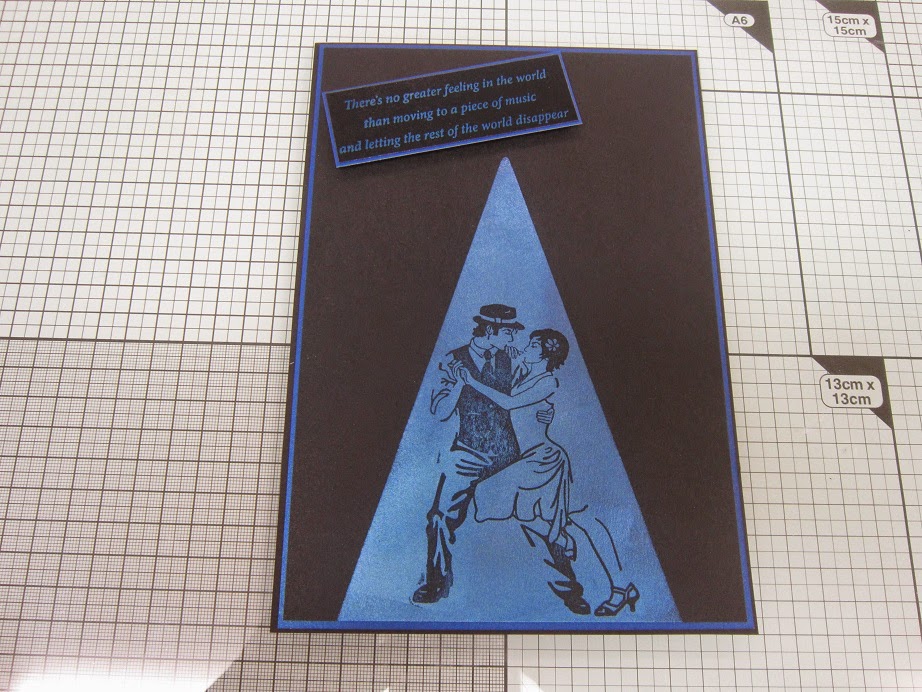
I've stamped my sentiment with Perfect Medium and then brushed over the Mica Powder. Don't forget to add your Antistatic Bag first though to keep your image nice and crisp...

This was then added to the project...
Just a last finishing touch...

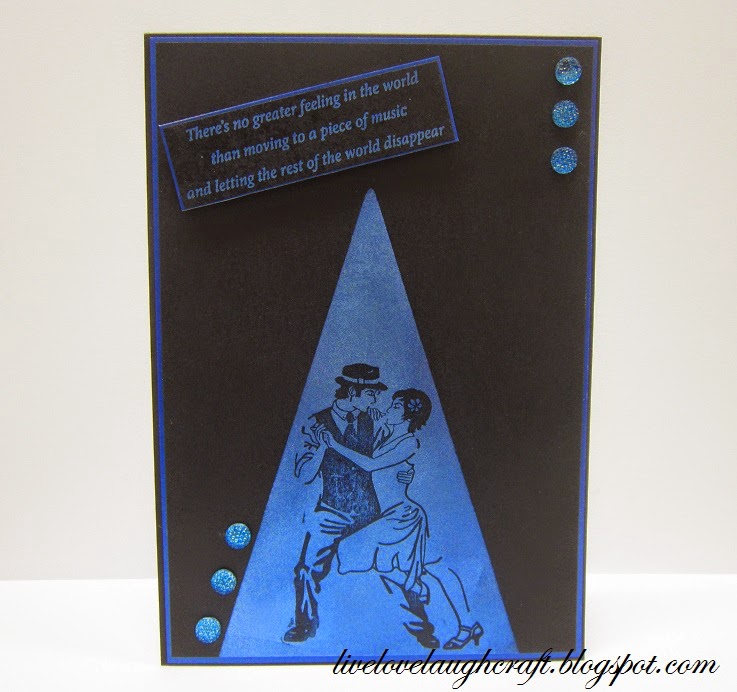
Take some Creative Expressions Small Circle Dazzles and apply a complementary colour using an Alcohol Marker Pen.

I found it easier to apply the colour whilst the Dazzlers were still on the packaging as it kept them in place whilst I coloured them and not whizzing around my craft mat!!

Then, apply them to your project with some Creative Expressions Glue...

And there you go...

I also completed a similar project using another of the Dance Stamps... Adding my own sentiment to complete the project...

So, enjoy your time in the spotlight and give it a go...
Thanks for checking us out.
See you soon.
Andy.

Ingredients Used:
(Blue Card project)
Cosmic Shimmer Glue
Small Circle Dazzlers
Mica Powders - Set #2 (Blue Pearl)
Perfect Medium
Argentine Tango Stamp
Step by Step Sentiment Stamp Set
Antistatic Bag

(Gold Project)
Vintage Gold Buttons
Mica Powders - Set #2 (Gold Pearl)
Perfect Medium
Vintage Gold Buttons
Top Hat & Tails Stamp
Creative Expressions Vintage Gold Card Stock