Hi Everyone. Today's post is the last but one for me on the
Cuttlebug Spot Design Team. After almost 6 Month's my stint is coming to an end! And what a 6 Month's it's been. Nilda has certainly set us some interesting challenges, which I hope you have enjoyed seeing as much as I have enjoyed doing!! Today we continue on this Month's theme of embellishments for your projects. And in particular, Buttons!! Go on; tell me that you don't have any in your crafting stash!!! Phah! Don’t believe you.....
When I knew about the theme of buttons the Vicar of Dibley popped into my head. Do you remember the episode about Dibley Radio when Alice and David were going head to head in a radio quiz? They were asked to get ready and put their fingers on their buttons, David immediately went for his buzzer and dim witted Alice held on to the buttons on her Cardigan.. Hilarious, you just cannot beat a good British comedy can you!!!

So, this is what I came up with...
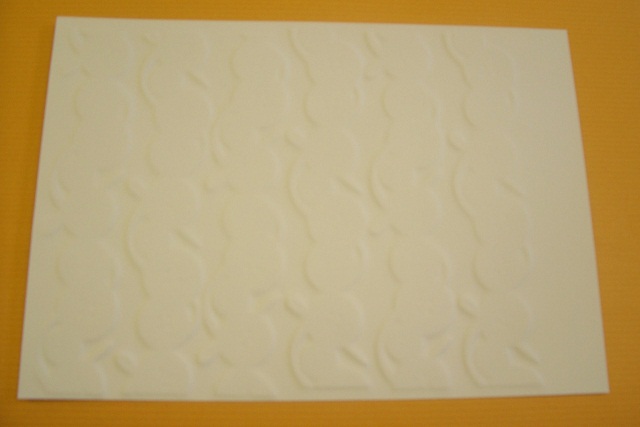
I've always been frustrated by the lack of crafting images available in embellishments and in particular, Embossing Folders!! For those who are able to visit the shop you'll know that I sit in front of hundreds of the things day in, day out! There are lots of flowers and flourishes and the odd geometric shape, but nothing actually crafty!! So, I decided to make my own embossing...

I punched out several strips in 225gsm weight card stock using the EK Success
Button Chain Trim Punch.

And then stuck them all together, so that there were four identical layers.

I then trimmed them to size

so that they would fit on to my Cuttlebug A plate.

Next, I added my card stock which I was going to emboss the images on to.

Followed by my extra thick
No Shims Mat

a shim of card stock

and finally finishing the "sandwich" with a C Plate and then passed it through the Cuttlebug.

I know it's difficult to see the detail,

perhaps some
ink will help?! How cool is that! Your very own embossing! This really is going to give your Punches or any other images you can layer a new lease of life!!!

Just for a bit of fun I also made up a Button frame on my
Gypsy. Cutting four layers in 225gsm weight card and layering them together

before passing them through the Cuttlebug with that same combination of plates and mat's as before...

A little bit of ink,

and the obligatory
Glossy Accents and you have your own unique frame...

Anyway, enough playing.. Time to carry on with the project. Earlier I said that I found it frustrating that there were very few products available with a crafting theme. Obviously the man of the moment "
Mr Holtz" thinks the same.. Great minds etc, etc.... So when one of his new dies "
Sewing Room" came in last week it was out of the box, out of the packaging and on my desk before anyone could say NO!
I cut all three images on the die in some White card stock

and added some Frayed Burlap
Distress Ink.

I then glazed each image with Glossy Accents. Once they were dry I added a little detail to each image in keeping with the Sewing Room/Button theme...

For the base card I had the idea of making a fake box, where else are you supposed to keep your buttons?
This was an idea I picked up from Winnie who came in to collect her "From the Nest" Cricut Cartridge Blog Candy at the weekend. She told me that she had entered a Joanna Sheen contest recently with a box themed card and that she had won the contest!! So that's The Blog Candy she has won and the Joanna Sheen Contest. I reckon you should get your ticket for this Friday's Euro Millions Lottery Winnie.. It's £117,000,000 (YES, One Hundred and Seventeen Million Pounds!!) as it looks like your luck is on a run. Just think how much crafting stash you could get with that amount of dosh!! So, I took the smallest shape from the Grand Nestabilities
Labels One and also the next but one size up and laid them on top of my wood effect card stock. Some of these shapes are small enough to be passed through the Cuttlebug. So the card stock and dies were placed on top of a Cuttlebug A and B plate

and topped with a C plate and passed through the machine

to form my box frame.

I then cut a piece of thick Acetate using the larger frame

and layered the pieces on top of my embossed button background.

To keep the shape theme going I also cut my base card using the large die,

remember to overlap one of the cutting edges over the spine of the card so that you keep the card whole...

I then added all of my embellishments to the card. Including a flower I had made some time ago using the Marianne Designs Creatbles
LR0128. The flower has been coloured using a Copic Pen attached to a Copic Air Can.. Something I am just getting used to, and at the moment I am wasting more air than achieving results, but I will persevere!!!

I finished the project off with a sentiment I printed from my PC and cut out with the Sewing Room die...

So, there are now no excuses for not having an embossing folder to suit your project. Just think of the possibilities just using your
punches or
Cricut!! Endless...
Oh, forgot to say. I used 225gsm card stock as this is the thickness I find works with most (not all) Punches and also having four stacked on top of each other makes a good thickness to be able to emboss. This is what worked for me, just be mindful of what you are asking the punch and your machine to do. This is a guide not a recomendation!
Pop on over to the
Cuttlebug Spot to see what everyone else has come up with. Remember, you only have us for another week!!
I hope this post gives you some inspo for your next crafting project, and thanks for checking us out.
See you soon.
Andy.
 It's not my favourite media to use, but I guess that's what crafting challenges are all about, trying something out of your comfort zone....
 I started off by cutting four 1/2" x 8 1/4" strips of felt..
 And then joined each length to the next
 to form a long length of felt.
 I then wrapped the felt around a ruler
 and then ran a length of double sided tape from end to end to secure the shape.
 Remove the felt from the ruler and flatten it out. Don't wrap the felt too tightly around the ruler as it makes it difficult to get it off. I learnt that the hard way!!!
 Wrap the felt around a pencil, removing the double sided tape as you go so that the felt sticks to itself.
 An unusual shape I grant you, but I think that's it's appeal..
 And look at the underneath, a funky little Rose. Two for the price of one!!
 And a little bit of sparkle by way of some Stickles, well it is the last Cuttlebug post for now, so why not?!
 I then used the Marianne Designables Embossing Folder Swirls on some matt Silver card stock,
 backing it with some Silver Glitter Card which shows through the cut outs in this Embossing Folder.
 I cut out some felt leaves using the Tim Holtz Tattered Leaves Die,
 also placing them in the Embossing Folder, just to add a little texture,
 I forgot that it would also cut holes into the material!! But I think I like it!
 For my base card I punched a border using the Martha Stewart Eyelet Trim Deep Edger Punch.
 Adding some of the Glitter Card used to back the Embossing Folder
 so that it would show through the punch.
 I then popped on the embossed image, finishing off with the felt flower and leaves....
 And there we go.. My final project.. I'm proud to say that I've managed to complete all of the challenges over the last Six Month's and I've had a blast doing them all. I've also met some amazingly talented Crafters along the way. So don't forget to hop on over to the Cuttlebug Spot to see what my fellow Design Team Members have come up with..