Wednesday 28 January 2015

And they call it... Puppy Love.....

Hi folks..

Last post today using January's Creative Expressions Design Team Stamps....

Today's project was inspired by another photo I have of Holly....

So, after Stamping and colouring "Toby"

I glazed him using Glossy Accents...
I love using Glossy Accents over a coloured image as it adds that dimension I often seek on my projects...

The other reason I like to use it is because it seals the image so that you are able to colour the White card stock with Ink. As the Glossy Accents (once dry) resists Ink, you are able to make the background whatever colour you like..
"Why not just stamp onto coloured card stock" I hear you ask? Because colouring in the image would just not work, most of the colours would not show up and there would be very little chance of obtaining any shading effects either...

Once I had coloured and trimmed the card stock to size, and before mounting it onto my prepared base card I spritz'd it with a little bit of water just to soften it slightly.. On this particular project it's almost created a faux velvet effect.. Bet I couldn't do that again if I tried!!!

And there we go, just added a few handmade embellies to finish the project off....
Thanks for checking us out, see you soon.
Andy.


Wednesday 21 January 2015

Paws for thought...

Hi folks... When I received January's set of Design Team goodies from Creative Expressions way back at the beginning of December,

straight away I had in mind this Scrapbook page featuring Hollister...

One of the sayings on the set of sentiments is "Dogs leave paw prints on our hearts". Which, as a dog owner, I know only too well...

The reason I knew I was going to use this sentiment at some point is because; having taken lots of pictures of Holly over the years I recall one of her early adventures whilst in the shop where she grabbed a bottle of StazOn re-inker, had a little chew on it, as puppies do, and hey presto we have Blue Paws!!!

I know, she looks very innocent,

but believe me, she knows how to lay it on very thick when she needs too!!! Love her to bits regardless though!!

Thanks for checking us out.
See you soon.
Andy.

Wednesday 14 January 2015

Back Filling!!!

Hi everyone.. Quite a simple project for me today.. I say simple, more in the result rather than the technique..

Sometimes you can spend hours on something and the result looks like it took you 5 minutes to do!! Some would call that a skill!!!!....
Either way, here's a step by step if you fancy giving it or something similar a go...

To start with I used the Sue Wilson Die - CED4101 New York Collection - Background to cut into a piece of White card stock.

I say cut "INTO" as this Die is an "Innie" not an "Outie" (There is no complete cutting edge running around the Die, so therefore it just cuts the design into the card stock..)
I have always been a fan of "Back Filling", I.E using the waste from a Die Cut as well as the positive image.. But sometimes this can be a thankless task,

although the result is a million times more effective

than just layering a positive die cut image over a complementary piece of card stock...
Now, you may be saying "Andy, haven't you got better things to do with your time?" and the answer would be a resounding "Yes, I have", but as my old boss once said to me "Any idiot can do it the easy way, it takes a genius to do it the hard way!!" Idiot or genius, answers on a postcard!!
Anyway, over the years I have tried various ways of swapping the background from one image to another..

Taking the pieces out one by one and placing them back in position, a little like a Jigsaw Puzzle was my main way of doing this, But I think I have finally stumbled upon a much quicker way of achieving the desired result in no time at all...

Take an adhesive sheet

and apply the Die Cut image to it.

Next, cut the image out in Black card stock, if you are lucky enough the pieces will stay within the card stock and we can work this to our advantage...

Simply lay the two images over each other
and poke the loose sections of the Black image into the open areas of the White... The open areas of adhesive from the sticky sheet will allow the Black pieces to be held in place....

Ta Da, one back filled image.

I've teamed this Die Cut up with this Month’s Creative Expressions Design Team Stamps. I think the generic design works quite well with "Poppy the Cat", or any of the others come to that!!
Thanks for checking us out.
See you soon.
Andy.

Wednesday 7 January 2015

Happy New Year (Belated).....

Hi Folks... I know we're well into the beginning of January, but as this is my first post of the year "Happy New Year" to you all...
Today's post is also the first post of the year for the Creative Expressions Design Team after our brief break over the Christmas and New Year holidays!!!

So, with a whole new selection of stamps and goodies to play with, here is what I've come up with for today....

To start off, I cut out the Spellbinders Die Fleur de Elegance (S4-475) in Black Card Stock

cutting out the centre using an Oval Die to create a frame.

Adding some Gilding Wax (Graceful Peach) to the frame to give it a metallic finish.

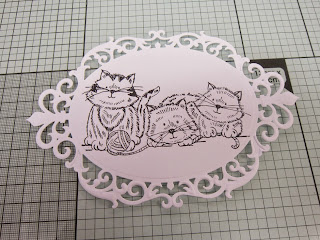
Next, I cut out the Fleur de Elegance Die in White card stock

and stamped my image using Black Archival Ink

and layered the Black frame directly over the White one to create my Photo frame effect.

This was mounted onto my prepared base card

to which I added a complementary bow

and some Pearl PVA Glue to create a "rivet" effect on the metallic frame..

Next, I printed my sentiment onto some White card, cutting it out with a Circle Die,

creating a frame with 2 Circle Dies on some Black card stock,

adding some Gilding Wax to achieve a Metallic effect as before.

mounting this around the edge of my sentiment

and then applying it to the project.

The sentiment frame was then finished off with the PVA Glue to create "rivets"...

to tie the whole project together....

Thanks for checking us out
See you soon
Andy

Ingredients used:
Spellbinders Die - Fleur de Elegance (S4-475)
Spellbinders Die - Classic Ovals Large
Spellbinders Die - Classic Circles Large
Cosmic Shimmer PVA Glue - Black Pearl
Creative Expressions Gilding Wax - Graceful Peach
Creative Expressions Stamps - The Triplets