Showing posts with label Cricut. Show all posts

Wednesday, 20 May 2015

The perfect "Pear"!

Hi everyone. This week’s Creative Expressions Design Team post is another slightly different one! Again, just to give you an idea of how to get the most out of all of your goodies....

The concept for this unusual Wedding Card is quite quirky, but I hope you "get" the play on words!?

I started off with a shape I cut using the Cricut Machine,

taking one of the darker, more highly pigmented colours of Mica Powder (Chic Magenta)

and "stroked" colour in form one side using a sponge. As the colour dissipates in the centre of the image, it starts to create the shading..

turning the image and colouring from the other side will enhance the shading giving the image slightly more dimension.

Adding a little Decadent Bamboo Mica Powder for the leaf and Decadent Oak for the stem.

Spraying the Pears with generic hairspray to seal the Mica and then applying a couple of layers of Perfect Medium and Clear Embossing Powder to "glaze" the images.

These were then added to my prepared base card to which I had cut 4 images using the Sue Wilson Configuration Collection Die - CED6302 Lattice Arched Adornment, joining each of the sections with a Dazzler form the Silver Collection...

Finishing the project off with my own printed sentiment...

I think this project will certainly make your card stand out from all of the rest if you're off to a Wedding this summer.
Thanks for checking us out, see you soon.
Andy.

Decadent Oak Mica Powder
Decadent Bamboo Mica Powder
Chic Magenta Mica Powder
Sue Wilson Configurations Collection Die - CED6302 Lattice Arched Adornment
Dazzlers - Silver Collection 8mm & 12mm


Tuesday, 16 October 2012

O Canada.....

Hi Guyz... Well, that's the folks packed off to Canada for a well deserved Holiday.. Up at stupid O’clock Yesterday to drop them off at the Airport. Some might say "to make sure they actually went" ... how very dare you... But yes, they did actually go, and after a long but rather comfortable flight with Air Canada they have arrived in Calgary safe and sound... Any of our Canadian followers out there, if you see em, don't forget to say hi... At the weekend it was my mate Tony's 40th Birthday "shin dig". And from what I can remember of it, it was a pretty good night.. Like many of you, I struggle when it comes to cards for the guyz.. And I came up with many connotations before I settled on the card I actually sent him... I have no idea what possessed me, but my original idea was to do the whole thing in Monochromatic (mono). Perhaps I was, in a way getting ready for next week’s Mono lesson? Not only did I decide to do Mono, but of all the colours I could have chosen I chose GREEN!! eeekk....
In some way, I kinda like this, but not suitable for this particular Birthday card...
I then tried Black & White.. Now Tony is Italian.. and this could have worked, but I kept getting the "Italian Gangster Mafioso" image in my head.. You don't want to offend an Italian now do you?
It looked equally good in White and Black, but still not what I was after... So, in the end, I plumped for mono Creams and Browns. It worked so well on my recent Skating card that I thought I couldn't go wrong..
And I was right... finally!! Hope these give you some ideas for cards for the guyz in your lives..... Thanks for checking us out. See you soon... Andy..

Friday, 6 January 2012

It's not Terry's......

Hi everyone.. After the excesses of Christmas, I guess the next big event most of us can look forward to to legitimately pig out on Chocolate is Valentine’s Day...
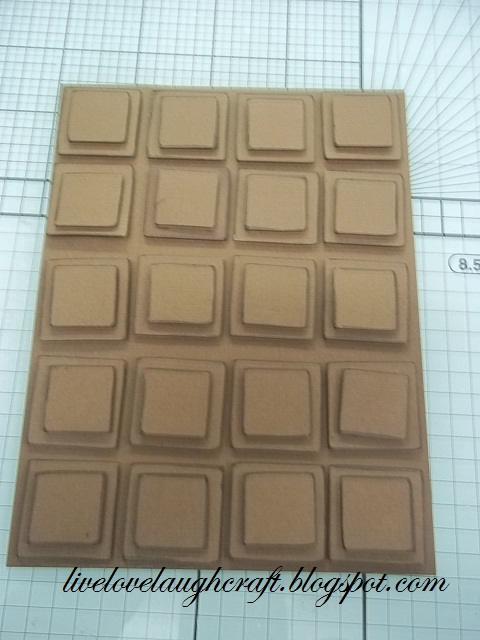
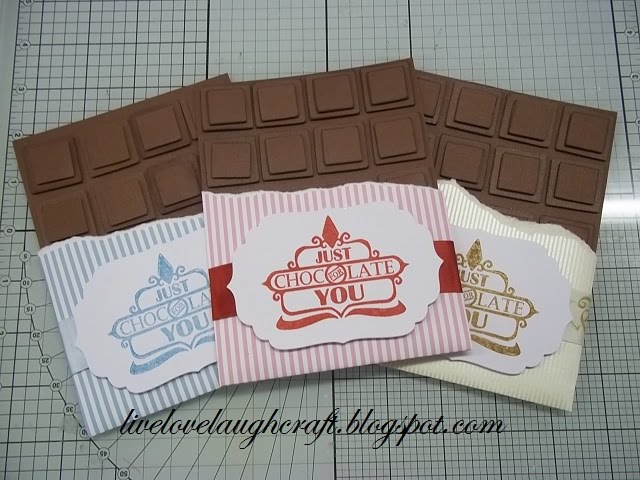
So, here is an idea for you to make for your loved one and the best part about it is NO calories!!!This is an idea I got from Sam Poole, take a look at her wonderful Blog, she has some great crafting ideas for you....I started off by cutting out 20 x 1" and 20 x 3/4" squares using Chocolate Mocha coloured Core'dinations card stock. I used my Cricut to cut out the Squares for quickness, but a couple of Punch's of these sizes could just as easily be used..I then went around the edges of each of the Squares with a Copic Pen. Any dark colour or Pen, such as a ProMarker can be used as it is really just to add an element of shadow to the Squares. Although I did all 40 of the Squares, you really only need to do about half of each size as some of them will be covered up later on in the project.Once coloured I layered the smaller Squares on top of the larger ones using double sided foam pads.Next, I cut a piece of the Chocolate card stock at 4 1/2" x 6"and spaced out the layered Squares to form my Chocolate bar..Take a 6" x 6" piece of candy stripe paperand tear it towards youand then wrap it around the Chocolate Barto form some wrapping.I stamped my sentiment (taken from Sam Poole's set called - Chocolate) onto White card stock using some Distress Inks in complimentary colours to suit my projects, Festive Berries, Broken China and Brushed Corduroy. Each sentiment was cut out using Spellbinders Nestabilities Labels Four.To line up my sentiment with my Ribbon, I found it easier to stick the label to the Ribbonbefore applying it to the project..The bar of Chocolate was then applied to a complementary luxurious piece of card stock, (well, it is for Valentine’s Day after all!) adding a Big Chocolate Box Ribbon to the side of the project to finish it off....So, that's one for her,One for Him,One for someone else,And I'd be happy with this!! No, it's not Terry's, it's mine!!
Thanks for checking us out..
See you soon.
Andy..

Sunday, 28 August 2011

From "Owl" House to your House....

Hi everyone. Yes, I am still around.. I know it's been a while since my last post but things here at Pinnacles have been a little hectic of late and finding time to blog has proved a little difficult.. But, I'm back now and I hope to share some of the projects I have been working on over the past few weeks with you on a bit more of a regular basis...
So, here we go with Today's offering...Back in January I was asked by Liz from Cricutolics to be a guest designer on her website.. Obviously, I said yes, as I think it's such an honor to be asked to showcase my work other than here on my Blog... As Cricutolics is a forum for those of us who have been bitten by the Cricut bug my project obviously had to be Cricut relate..So, here is what I came up with.I cut out the Birdhouse shape from the Stretch Your Imagination Cricut Cartridge @ 3.75". Cutting the shape in Grey card stock using the Blackout and Silhouette functions and the "normal" image in Pink card stock..Layering the images together with some Pinflair Gel to give them some dimension..I then punched a border in White card stock using the Martha Stewart Drippy Goo Punch,adding it to the base of each of the 3 Birdhouses that I had cut to act as snow...I then cut out a few Branch shapes using the Mariannes Creatables Pine Tree Branch die (LR0181) using some Green Glitter card.And then added them to my base card which I had already placed my Birdhouses onto.Next, I cut out these little Go Kreate Owl figures adding some googlie eyes to give them some character,before popping each one on it's perch and finishing off with a "From Our House" peel off as my sentiment...So, there you go.. Not only a Christmas card but I think the concept could be used as a New Home / Moving card too?!.. And, for all you Cricut fans out there, just look at all the new Cricut Cartridges that will be winging their way to us at Pinnacles very soon...
Anyway, it's good to be back and hope to see you again soon.
Thanks for checking us out.
Andy.

Friday, 13 May 2011

One for the boys!!

Hey blogland.. It's all too easy to do cards for female friends and relatives, but when it comes to us guys, even I struggle... That said, there are a lot more images and products around now than there ever used to be, so it is getting slightly easier...For this card I used a digi stamp from Mo Manning..It was coloured with Copic Pens and Glazed with Glossy Accents.Whilst it was drying I had a play with my Cricut Machine and Gypsy and welded some Mobile (Cell) Phone shapes from the Smiley Cards cartridge to a Rectangle from Plantin Schoolbook and cut them out on some Silver Mirror card.Once the image was dry I matted it onto the rectangle and added some Black Mobile Phone shapes to make them stand out a little more..After matting one more time onto some light Blue card stockI attached the image to my base card.I then cut out a tag using a die from the Spellbinders Ribbon Tags Trio Three (S4-323) set.Added a peel off sentimentand then threaded some ribbon through the loops before adding it to the card to finish the project off.So, just an idea for some of the younger guy's in your life..
Thanks for checking us out.
See you soon.
Andy.