Wednesday 25 November 2009

Now don't be Koi!!

Hi Everyone.. Phew!! what a week so far.. The lead up to Pinnacle Crafts Club Members Weekend is always a little bit frantic.. Getting the shop stocked, orders marked off and everything ship shape for a smooth discount weekend.. Well it's almost here, in fact the last one of the year! So if you are coming along we all look forward to seeing you.. That said, amongst the general running of the shop, teaching, serving, orders etc I have still found a "brief" moment to craft!!
I think I'm all Christmas'd out for the time being. So I fancied ringing the changes a bit for this project.. So out came my trusty Cricut.
I cut 3 Koi images at 3" from the Pagoda Cartridge using some great new patterned mirror card we have in stock. I then cut out corresponding images on plain mirror card using the Blackout function.
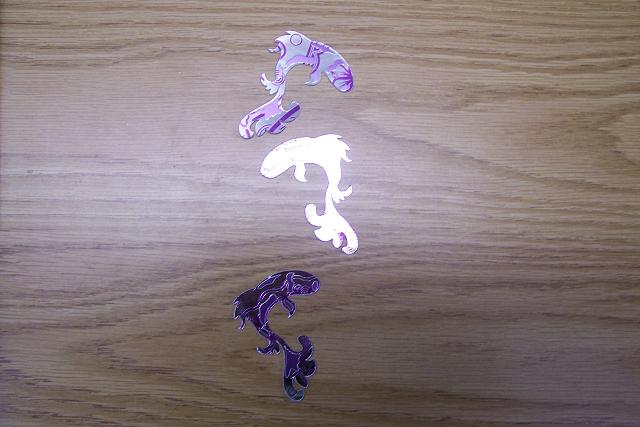
and then layered the pieces together.I then cut out a 7" Square from Winter Woodland Cartridge, I used the Centre Point function to cut out an inner Square at 5" which left me with the frame I wanted.. The idea being to make a pond for the Koi..
I wanted to make the edge of the pond a bit more interesting, so I embossed around the frame using the Glitter Girls Elegance and Fantasy Embossing Board.To add the element of water I randomly applied Pool & Stream Alcohol Inks to a piece of Acetate.I also cut a piece of heavy glittered card stock to size, this I will use as the base to the pond!
Now I have all of my elements for the card I'm ready to rock and roll and assemble it.I added a strip of double sided foam tape to the under side of the embossed piece of card stock and a double layer of foam tape to the Acetate, this was to give a bit more dimension to the finished card.
Position the Koi images onto the Glitter card stock and the mount the Acetate and frame on top of each other.. How good does this look??
I would have been happy to leave it there and use it potentially as a picture, but in the end decided to mount it onto a card. Keep it simple I thought! But a simple card was exactly that.. too simple.. It just needed a little something..
So with my trusty new corner punch I punched the Two outer corners with the wings of the punch open..
Did you know that you can punch the corners of the card next to the spine without punching all the way through both sides of the card??! Well here's how...
Open just one of the wings and buff it to the edge of your card. Halfway down the side of the punch is a little notch. Line this up with the spine of the card and punch.. Hey! it just cuts on one side of the card. Cool eh!!? Repeat this on the other corner...Simple, but effective..
I also added a few Lilly pads, which were cut from the Pagoda Cartridge at 1" Real Dial Size, these were randomly applied to the picture which was then mounted onto the punched card... A little closer so you can hopefully see the full effect.. If not it's on display in the shop, so if you are in for the massive 30% Club Members Discount over the weekend you can see it for real...

Thanks for checking us out..
See you soon
Pinnacles......

Friday 20 November 2009

It's been a long time coming..

...but they have finally arrived! The Punch Around the Page sets are here....
I have been waiting for ages to get my hands on these, so as soon as they were in I got to playing with them..At the moment we have three sets available..Snowfall..Rings...and Scallop 3 Dots..These punch sets are unique in the fact that they allow you to punch all the way around a piece of card stock, using specific measurements.. Don't worry! they are simple measurements and all the instructions are in the box...
For my sample cards I cut out 2 5" circles from my Cricut machine, but any other tool that allows you to cut 5" circles is fine.
Now, you may remember back a few weeks ago the Butterfly card I did?! The method for this card is basically the same..Take a waste piece of card and cut in a circle at 5". Fold in half and the fold in half again. Where the 2 folds cross will locate the centre of the circle.lay this piece of card over your patterned card stock and mark the centre.
Then dissect the piece of card into 8 equal sections using a Ruler and Pencil passing through this centre point.Take your corner punch "with the wings closed" and line up the notch at the front of the punch with one of the pencil lines.Guide the punch to the corresponding horizontal pencil lines and punch through the card stock.Repeat this all the way around the circle on both pieces of patterned card stock.
The centre will pop out and you are also left with a cool negative piece to use.
Apply glue to the second Frong in from the right, all the way around your image and adhere it to the negative image.With the second negative image, apply foam pads to the back and position on top of the Snowflake image rotating it slightly.I then cut a piece of light Blue Mirror card ( sorry, I know it looks Green!) 5" x 5"
and cut the corners with the corner punch, notice the wings are now open.
then line up your border punch and cut along the straight edges of the card, connecting the pre cut corners..Lay all of your cut images together to see the best way to put them together..
I then did the same process with a Gold piece of Mirror card this time cut at 6 3/4".It's all starting to come together now!
I mounted the Gold card onto some complementary Blue card stock,
then the Blue Mirror cardand finally my initial image...
There are lots of different combinations your could do with these punches, the difficult choice was really which one to go for, and there are more designs on their way... Good job Christmas, and Club Members Weekend is just around the corner don't you think?!!!

Anyway, I hope you like the samples and that they give you some idea of how these amazing punches work, but as I said FULL and SIMPLE instructions come in the box.. Also the punches can be used individually or together and are great value and excellent Christmas Gift ideas...

Thanks for checking us out...
See you soon
Pinnacles...

Wednesday 18 November 2009

Going back to our roots!

Hi Everyone. It seems only yesterday when Pinnacle Crafts opened it's doors to the public, in fact it was over 6 years ago that Joanne & Pauline first set up our (then) little shop at Barleylands (boy, haven't we grown!).. And this week we have been revisiting the product that got the ball rolling and has made Pinnacle Crafts what it is today!! Pinflair...Back in 2003 Joanne took redundancy from her career with a German Bank in London.. With a little time on her hands she took herself off to one of the big craft shows here in the UK and came across a stand selling Pinflair. She got chatting with the owner Christine and the rest as they say is history!! She purchased a few kits and loved making the products. I, at the time was working for John Lewis Department Stores and said that the Buyers would lap these products up.. which they would have! However, we would never be able to make the products up in the quantity required! So, we decided to set up our own shop and now Pinnacle Crafts is one of the largest stockists of Pinflair products in the UK and the products have a firm fixture within our store.
The Pinflair items are simply, Polystyrene shapes with Sequins, Beads & Ribbon attached to them. Once the shape is completed you would never guess that underneath all the intricate work there is a simple polystyrene shape holding the whole thing together!
We make many gifts for customers who want something special for a Wedding, Anniversary or just a keep sake and just love the oooohs & ahhhhhs when they see the gift made up for them..These Bells are my favourite. OK, they are not quick to make but boy are they effective.. We use them to decorate the Christmas Tree and can also be used for Wedding Bells as we can make them in any colour combination we wish.. And one of the best things about them is that they do not break and can be handed down from generation to generation..Or how about something a bit more contemporary for your Tree this year..
I really think the best thing about these Bells is the one thing you rarely see, the base. So much work!!
Obviously our lessons are not long enough for our customers to complete the Bells in time. So, ever resourceful we came up with our own design for our customers to complete..A great Bauble card.. Simple, but oh so effective...!

So why not give it a go..
Thanks for checking us out.
Pinnacles..