My lunchtime dog walk was fun! Well, for one of us anyway...
 This was Holly's first real taste of the White stuff, and when I say taste I mean taste, she just lapped it up. Literally!!!
 And yes, she has gotten big hasn't she, almost 6 months old now and still as beautiful as ever..!
Anyway, enough about the weather, on with some crafting!
I forgot to mention, late last year one of my best friends asked me and another of his friends to be the Best Men at his wedding.. Two Best Men!, now that's different! But he said he just couldn't choose between us, so it was both or neither.. Needless to say, both of us jumped at the chance to stitch him up, I mean, support him on his big day! The added bonus is that he is getting married in Gran Canaria!! So we have an Italian, marrying and Egyptian on a Spanish Island. Can't get much more eclectic than that! Guess that's what makes this whole big marble we all live on go round!!
So, I've started to make a few samples to see what kind of wedding card I can make for them....
 And this is the first one...
It's quite traditional in it's make up, and to be honest I don't think it's really them, but hopefully it will give you some inspiration if you have Wedding or special Anniversary this year...
 To start off with, I cut and embossed the Anja's Edge Die (LR0202) in to some Ivory card stock. Notice that, just like the Anja's Corner Die (LR0200) used on a project a few post's ago, this die does not cut out of the card stock, it leaves a fantastic edge to it!
 I then turned the card stock around and used the Die on the other edge. This left quite a nice effect to the card stock.
 I added some foam tape to the solid centre area of the card stock and layered it onto another piece of the Ivory card stock.. Tone on tone can be very effective. In fact, I have used the same coloured card stock for the whole of the project...
 On a separate piece of card, I added a thin piece of ribbon around it
 and then positioned it and the die cut piece of card onto my base card.
 Next, I cut out two images using the Marianne Creatables Key Die (LR0193).
 Tying them together with some Ribbon, before securing them to the base card with some foam pads.
 I then cut out the largest shape from the Spellbinders Classic Heart Die (S4-136).
 And placed this onto my project using foam pads to add some more dimension to the project.
 Next, I cut out the car using the Classic Cars Die (LR0198).
 To make it look more of a Wedding car I added a length of Ribbon to the Bonnet (hood) and top of the car,
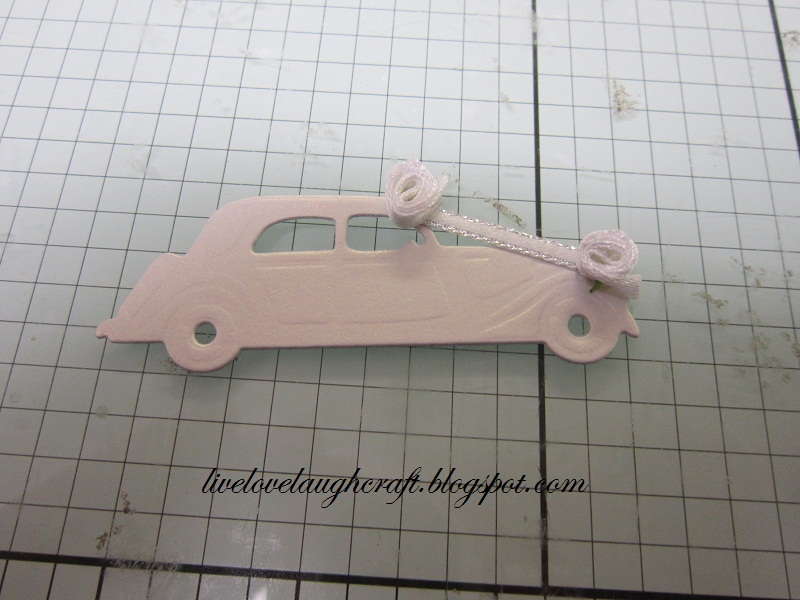 hiding the ends of the Ribbon with some Roses. The Roses are a little out of proportion to the car, but they were the smallest I had, and if you can't be a little flamboyant on a Wedding car card, then when can you?!
 The car was then added to the project,
 and I finished the whole thing off with my sentiment and some heart gems...
I'm surprised that, although I have used the same colour card stock throughout the project, each element stands out on its own, and yet they also work together! Obviously, this could also be down to my brilliant photography! Yeah right!!
 Hollister doesn't seem to think my photography skills are up to much either!! Oh well!
Thanks for checking us out, see you soon.
Andy.