Frosty winds may blow... Hi Blogland.. After a brief hiatus for the Christmas and New Year Holidays the
Cuttlbug Blog Spot Challenge is back.. This weeks theme is
Winter.. And although we here in the South East of the UK are basking in somewhat unseasonably warm January weather we are most definitely in Winter.. Just wait until it starts turning colder at the end of the week bbbrrrrrrr...
So, that's the theme of this weeks challenge. Winter... using texture, buttons, twine, ribbon etc...

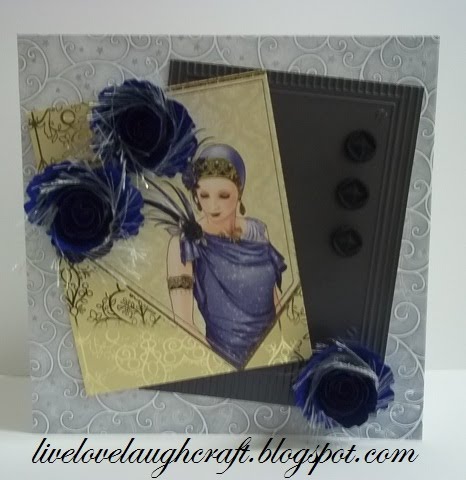
I could have gone with a wintry scene as requested, but I just kept on seeing Christmas, so I decided to go with some frosty flowers instead... Now, I know this main picture doesn't capture the frosty nature of these flowers! But, just wait and take a look at them a little further down this post to see them encapsulated in all of their frosty glory.. Sorry, I've been watching too much of Nigella over the holiday's!! She just loves an exaggerated description or two don't you think?!

Any hoozlebee's, starting off my project was quite simple.. I chose an Art Deco image from a Decoupage set from the Glitter Girls and cut it out.. It was the Blue of the dress that caught my eye and gave me the colour theme to work with...

To cut my flowers I used the Spellbinders Die
Spiral Blossoms #1 (S4-351).

Cutting out the shape and then Quilling (rolling) them into shape securing them with
Pinflair Glue.

Next, I took some fibrous cord

and inserted it into each flower to give them a frosty look...

To continue the "Art Deco" theme, I embossed a piece of Matt Silk card stock using the
Deep Sea Diver Embossing Folder which is part of the
World Fair range of embossing folders from
Couture Creations.. Deep Sea Diver!! Where do they get these names from!!?

Once this was embossed I added it to my wintry swirl background paper,

adding my Deco Lady

and frosty flowers...

Finishing off the project with some complimentary "Deco" Buttons...

Very apt for a wintry Birthday I think.. Don't forget to hop on over to the
Cuttlebug Blog Spot to see what my fellow
Design Team Members have come up with under this theme, and whilst you are there why not take part in this weeks challenge?!
Thanks for checking us out...
See you soon..
Andy..


 It's very classic looking, and out of all of the samples I have made to date, this one is my fave....
 The image came from a die cut topper set from Hunkydory.
 I wasn't too keen on the edge which came with the topper, so I chopped it off
 and matt and layered it with my own choice of edging. This was put to one side whilst I prepared my base card.
 To start off with I cut out two edges in Gold Mirror card using a die from the Spellbinders set Persian Accents (S5-078). I've used this die on a previous project (which is on display in the shop), and at that time I used it on the Cuttlebug using the standard sized plates. Knowing full well that the die was longer than the plates I still proceeded to use it. And low and behold the edge of the standard Cuttlebug plates made an indentation in the Spellbinders die, although it cut perfectly well I can only think that this indentation will have weakened the die. I really would advise you to be careful when using a die which is bigger than your machines plates. Either treat yourself to longer plates or use these longer dies through the Grand Calibur machine, which is how I cut these images out.
 I then adhered them to my base card, which was part of the set which came with the Hunkydory die cut.
 This in turn was matt and layered onto some Gold Mirror card to keep the Black and Gold theme going throughout the project.
 I then added my topper.
 So, I cut out a shape using the Cheery Lynn Mega Flourish Two die (B169) in Gold Mirror card
 and placed it on the project to finish it off.
 I could have gone with a wintry scene as requested, but I just kept on seeing Christmas, so I decided to go with some frosty flowers instead... Now, I know this main picture doesn't capture the frosty nature of these flowers! But, just wait and take a look at them a little further down this post to see them encapsulated in all of their frosty glory.. Sorry, I've been watching too much of Nigella over the holiday's!! She just loves an exaggerated description or two don't you think?!
 Any hoozlebee's, starting off my project was quite simple.. I chose an Art Deco image from a Decoupage set from the Glitter Girls and cut it out.. It was the Blue of the dress that caught my eye and gave me the colour theme to work with...
 To cut my flowers I used the Spellbinders Die Spiral Blossoms #1 (S4-351).
 Cutting out the shape and then Quilling (rolling) them into shape securing them with Pinflair Glue.
 Next, I took some fibrous cord
 and inserted it into each flower to give them a frosty look...
 To continue the "Art Deco" theme, I embossed a piece of Matt Silk card stock using the Deep Sea Diver Embossing Folder which is part of the World Fair range of embossing folders from Couture Creations.. Deep Sea Diver!! Where do they get these names from!!?
 Once this was embossed I added it to my wintry swirl background paper,
 adding my Deco Lady
 and frosty flowers...
 Finishing off the project with some complimentary "Deco" Buttons...
 Very apt for a wintry Birthday I think.. Don't forget to hop on over to the Cuttlebug Blog Spot to see what my fellow Design Team Members have come up with under this theme, and whilst you are there why not take part in this weeks challenge?!