Showing posts with label Do Crafts. Show all posts

Thursday, 30 October 2014

Pretty in.... erm... Blue....

Although I am working on a Pink version...
Hi folks..... Another sample for Saturday's Demonstration Day here at Pinnacles...

From other bits and bobs that I've posted recently, you may have guessed my colour theme this year is Blue, although not exclusively!
I've teamed this one up with some of the Pearlescent Pan Pastels...

I hope you can notice the holly stamp is stamped both in the negative AND the positive?

I say negative first because in all sense and purpose, it is a negative stamp, but to get a positive out of it too is just an added bonus..

I'll be sharing with you how to do this on Saturday....
Thanks for checking us out, see you soon.
Andy.

Sue Wilson/Creative Expressions - CED3008 Classic Poinsettia
Do Not Open Tag - XCU 503929
Sizzix - Holiday Greens (658759)
JustRite Holly Swirl Cling Background Stamp (02068)
Pearlescent Pan Pastel - Blue
White Coarse Pearl Medium for Pan Pastels

Friday, 8 November 2013

Deck the Halls.....

... Hi folks... I think I have finally settled on a design for my own personal Christmas Cards this year!

It has a little bit of everything on it, Pan Pastels, Embossing and Die Cutting. So, it should keep my busy over the coming weeks!
Off to start churning them out, or variations thereof!!
Thanks for checking us out.
See you soon.
Andy.
Metallic Pan Pastels: Bronze, Copper, Light Gold, Rich Gold, Silver.
Cheery Lynn Die: B148 Holly Lace Flourish
XCut Embossing Folder: Delicate Flourishes
Deck the Halls: Tonic Studios Die Set Christmas Sentiments One

Tuesday, 14 June 2011

Like Marmite! You'll either love it or hate it!!

Hey Blogland.. Now, I know some of you are going to start shouting at me and some of you are going to enjoy today's post!! Today I'm sharing my first project of the year featuring the dreaded C word!! No, not that one, nor that one either!!! But Christmas!!! (covers ears!!)And yes, we are in summer here, but you know you've got to start some time! So maybe it will fool your subconscious into cooling down a bit!!So, here we go with our first Crimbo step by step!!
I started off by embossing a piece of White card stock using the Petal Embossing Folder from the new Black & Gold Forever Friends range..To me these little petals look a little like Snow Drops.. Not that I am much of an aficionado when it comes to plants!! I felt they needed a little bit of something to really make them pop off of the card. Initially I thought of adding gem stones to each set of petals! However there are 78 of them! (Thumbs up if you are now counting them!!) So that would have worked out too expensive. So I took some Pearlised Glue and added a dot to each set of Petals...Great effect huh!!Whilst the Glue was drying I took a piece of White card stock measuring 6 3/4" x 5" and punched around it using the Martha Stewart Vintage Floral M40-60043 Punch Around the Page set.. This set of Punches is also known as Deco Flowers..The space created in the middle of the punched area was just perfect to sit my embossed petals into.I had already prepped some die cut Decoupage, so this was added on top of the framed embossing.. It's all coming together now!!!I prepared my Easel card using some pre embossed dot White card stock,adding a second Decoupage image for my easel Stopperand then adding the framed images to one side of the cardand my sentiment to the other side of the card!!And there you go, one Crimbo card down, several more to go!...This card and many more will be on show at our Christmas in July Event on 09th & 10th July... So you can come and see it in the flesh if you are in town!!
Thanks for checking us out..
See you soon for some more inspo...
Andy..

Thursday, 28 April 2011

More 40th Samples....

Hi Everyone.. Well, only one more day to go until the Royal Wedding.. The TV Channels seem to have gone into melt down. God knows what it's going to be like tomorrow!!Each to his own I say, so we are well and truly getting into the spirit of the occassion here at Pinnacles... Bucks Fizz for us all in the morning... hic!!!
Further to my last post here are a couple more samples of the 40th birthday card I'm trying to decided on..This first one I have to admit is my favourite so far, for the colour combination and the simplicity, although I feel that it is more of an invitation type card than one that your would send.. So it will be resigned to the shop shelves as a sample.. But, here's a step by step none the less...I cut out a few swirl shapes in pearlised Black card stock using a die from the Marianne Creatables set Frame Circle (LR0112).It was whilst taking the previous picture that I noticed that one of the shapes looked like a sophisticated letter "S"and then when it was turned around it looked like a letter "C". As it is Sarah who's birthday it is how appropriate that an "S" should appear.. Co-inkidink? or fate??.. oooohh spooky!!How great would an invitation look with these initials on them. OK, I grant you this find has it's limitations as you would have to know someone with one or both of these initials, but I think it is a great additional use for this shape. I'm a glass is half full kinda guy!! (not half empty for those that do not understand that expression)..So, once I had finished telling everyone that would stand still long enough to listen, I cut a Scalloped Oval in Black pearlised card and a Plain Oval in Teal coloured card stock,layered them together adding the "S" for Sarah to the top layer.For my base card I cut a DL card from A3 card stock, notice the crease on the shortest side.. Added a matt of the Black and Teal card stock and a couple more of the swirls.Adding my topper to the centre. As I said, more invitational than a greetings card, but quite striking if I do say so myself!This next one is again very simple. But knowing that Sarah loves "From me to you" bears, it is also very apt!!
When I saw the new Do Crafts Creativity Magazine (Issue 27) which came in this afternoon this idea sprung in to my head... I decided to use one of the FREE stamps which comes with this magazine for this sample as opposed to one of the other stamps which form part of the range.I stamped the image using London Fog Memento Ink and coloured the body in using Cool Grey #1 (C-1) Copic Pen and the essential Blue Nose using Pale Blue (B23).The image was cut out and embossed using the large die from the same set I used in the project above Circle Frame (LR112)..I then simply threaded some ribbon through all the loops creating quite a good effect I think!You may have been thinking "hey Andy, you stamped, you coloured but no Glossy Accents!!" What's going on!!! Eh voila! As if I would forget that!!!Whilst the image was drying I printed my sentiment onto some Safmat, which is an adhesive film..The sentiment was cut out using a die from the Fleur DE Lis Doily Accents Spellbinders set (S5-042).I was tempted to leave the backing on the Safmatbut peeled it off and applied the sentiment to the inside of a prepared Acetate card... On Acetate the Safmat gives a frosted effect, but when applied to solid card stock it will be clear and you will only see your printed text or image.Finishing the card off by adding the Tatty Teddy image...
So, now I have a choice of 3 cards to give this weekend!! Well, it's actually 4, but I'll show you the last one on Saturday.... I know I'm a little tease.. I've been called worse! No, really I have!!!
I hope you all enjoy the Royal Wedding tomorrow if you are watching it.. Apparently it has a very British theme, so hopefully it will put some pride back into this great nation of ours....
Thanks for checking us out.
See you soon..
Andy.

Tuesday, 1 March 2011

Blog Candy & Hat Pins!!

Hi Blogland. A weird title for this post I grant you but all will become clear as you read through today's post!First things first. The winners of our 30,000 visitor Blog Candy. I say 30,000! In fact we have had over 40,000 visitors since we started our little Blog in July 2009! I was having a tour of our Blog the other day and tidying a few things up and noticed a stats button I never even knew I had! It tells me where everyone visits us from and gives a true visitor number. I had taken my 30,000 figure from the NeoWorks Scroll at the bottom of our Blog. I have only had this for little over a year so I guess it only picks up stats from that period of time.. So, the winners of our newly named 40,000 visitor Blog Candy drawn at random are.......Drum Roll please..... Cricut Straight from the Nest Cartridge... Winnie and the winner of the Cuttlebug Companions Set Cindy Loo is Charity Crafter aka Leigh.. Congratulations ladies. I have e:mailed both of you to let you know you are winners and to arrange delivery or collection of your new stash!!
Thank you to everyone who left comments and good luck for our next Blog Candy contest.
So on with the crafting side of today's post.This Month over at the Cuttlebug Spot it's all about embellishment's on your crafting projects. Of course, as it's the Cuttlebug Spot Embossing will also be involved!!
Today's theme was to incorporate Hat Pin's onto your project! I like to think outside the box but for this project I stuck with the obvious.. Well, obvious to me anyway!
I've always wanted to do a project just in one tone of colour, particularly in Grey's. Not an easy colour to work with but am pleased with how the whole thing turned out!!You probably know that I'm well into my Digital Stamps at the moment! I got this image from Sassy Studio Designs. Once printed, I coloured it in with my Copic Pens (Cool Grey #1 and Cool Grey #5 and Strong Red for the lips). Of course she had to have a glaze of Glossy Accents to finish her off!Once the image was dry I added a selection of feathers to the hat,popping on a hat pin and some beads I had left over from an old Pinflair Kit. Looking at the image now I think the pin is not in proportion to the hat, but I think anything smaller would get lost on the image..
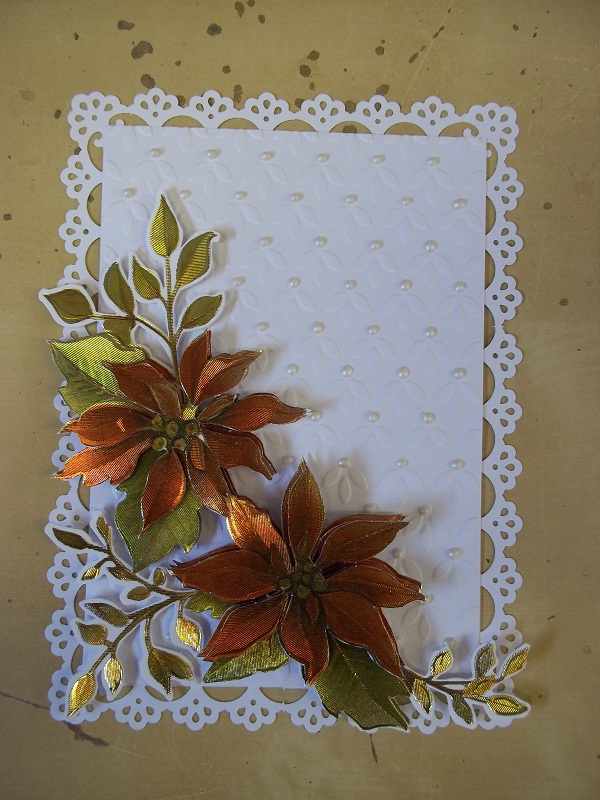
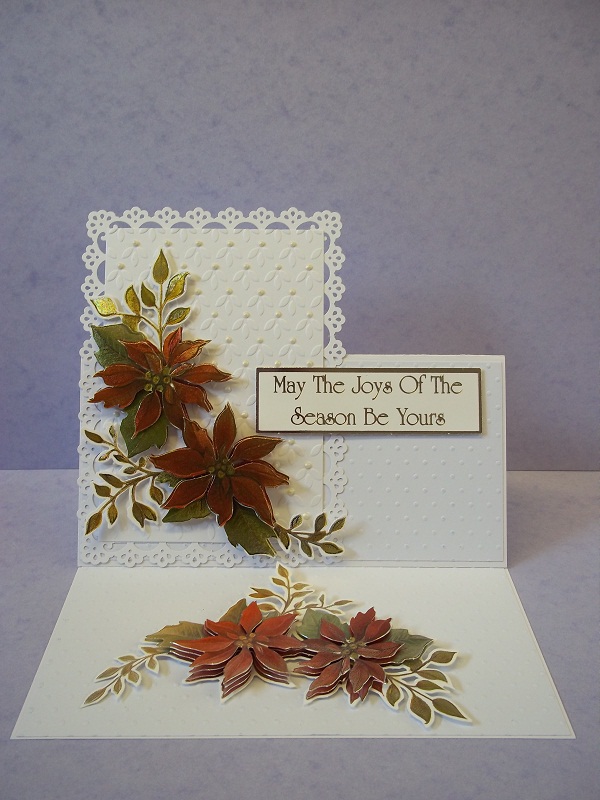
For the base card for the image I embossed a piece of White card stock using the Flourish Embossing Folderand matt and layered it onto some Silver and White card stock.I then cut out some layered shapes from the Storybook Cartridge using my Cricut. Looking back, a Nestabilitie Labels shape would have worked easily as well!!Just for fun, and because I wasn't sure in which direction I was going to take this project! I cut the frames in half!!These were added to the front of an 8" x 8" easel cardwith the embossed image placed over the top of them. It looks like the frame shapes are much bigger than they actually are, almost like one of the Grand Nestabilitie Labels.. I think this is a great way to get more out of your standard Labels Dies if you don't have the Calibur or the Grand Dies!
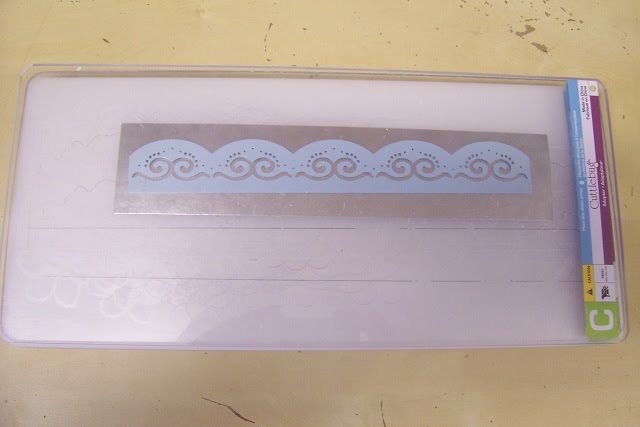
For the step of the Easel card I used one of the new X Cut Border Dies.
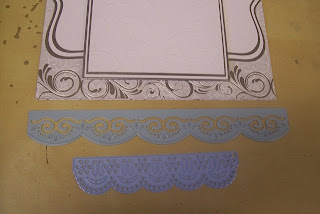
These Border Dies are really quite big compared to say one of the Marianne Designs Creatables Borders. OK, maybe not as detailed, but for this project size does matter!!They are about 8 1/4" long so in fact too long to use the standard Cuttlebug Plates if you want to use the whole of the die, so therefore I had to use the longer Cuttlebug plates.To cut the die, you will need an A and B plate followed by your card stock and the die,finishing off with your C plate and pass through your Cuttlebug Machine.To emboss the die, turn the die over keeping the card stock within the die.As the die was so long I added a strip cut form the Spellbinders 12" x 12" Tan Mat and passed it through the Cuttlebug.. Absolutely nothing happened. I guess these Dies are not as deeply cut as the Nestabilitie Border Dies which is what the Spellbinders mats are designed to emboss.
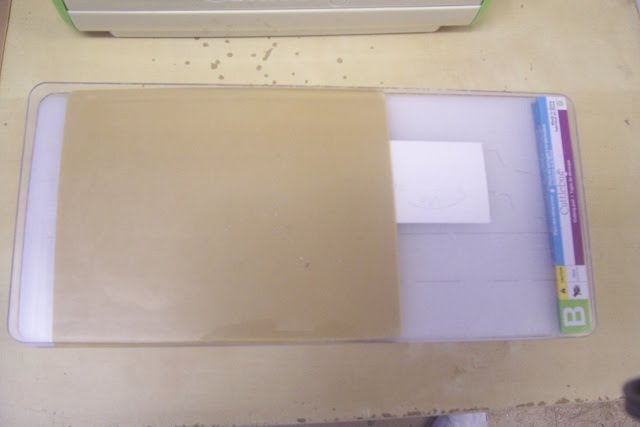
I could have added a shim of card stock but seeing as I had my No Shims Required Mat to hand I just popped this on followed by a second B plate this timeand passed it through the machine twice..Eh voila!!I then added it to the base of the Easel Card.I really wasn't sure where I was going to place my stamped image. So YES, I just shut my eye's and went with it!! It really could have gone anywhere, good job I had it up the right way!!The easiest part of the whole project was the sentiment. The new Do Crafts Promotion for March/April is now in stock and one of the new items is this sentiment sheet.. The perfect match for this Grey/Silver/White card....And there you go... I hope this gives you some ideas for you projects, and don't forget to hop on over to the Cuttlebug Spot to see all the other Design Teams projects.
Thanks for checking us out.
See you soon.
@ndy