Tuesday, 25 September 2012
Get your Skates on.....
....Christmas is a coming... Only 90 days to go now... And how do I know that! Well, apart from the obvious, I counted them on my calendar! But also, today is MY Birthday (see, I said there were a lot of Pinnacles Birthdays in September!) and it is always exactly 3 Month's before Christmas... The countdown begins now...!So, here we go with today’s project.
Ideal for a guy's Crimbo card perhaps? Dad, if you're looking, this one is probably gana be yours soon!!
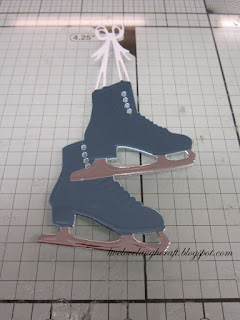
So, here we go with a step by step if you fancy giving it a go?!To start off with, I cut out the Marianne Designs Creatables Skate Die (LR0247) in some Cream coloured card stock.I then cut out the die again, this time in Silver Mirror card. I cut off the laces part of the dieand applied it to the Cream image.Next, I cut the die out in Blue Mirror card and cut away the laces and the lower skates’ blade, so that when the Blue image was applied on top of the Silver image, the blade would still show. (Sorry, no pic of this stage!)I then cut out a second Silver image. This time, cutting away the upper skate bladeand then applied it to the Blue image.. Really gives it that dimensional look and shows each element in its correct colour. Cream laces, Blue Boots and the Silver Blades.. Worth doing, but works quite well without, as you'll see in an upcoming post!
For the background of the card I had to have a little play with some of our new and existing Spellbinder Dies..So, using the Spellbinder Fancy Lattice Die (S5-152), I cut "into" some Blue card stock. This die is one of the new "Expandable Pattern" Dies which means it will cut "into" a piece of card so that you can then place the die next to the initial cut and cut again, therefore making the image expand! There are a few of the new dies which are able to do this: Basic Lattice (S5-151), Botanical Swirl (S5-154) & Butterfly Magic (S5-154)... So, there is good potential to make some rather large projects, depending on your die cutting machines' capabilities...That said, I only used it in its simplest form, layering it behind a faux embossed and cut out image for which I used the Spellbinders die Floral Ovals (S4-356).Backing it with some more Blue cardbefore mounting it onto my prepared base card to which I then added the Skates I prepared earlier.
The embossing down the side of the card was produced by using the Swirl Corner Embossing Folder which is one of the new Embossalicious (who thinks up these names?!) Embossing Folders. They are a range of 6" x 6" and 8" x 8" Embossing Folders. So, if you enjoy making larger cards, these will be ideal!And there you go..
Don't forget its Pinnacle Crafts Club Members Discount Weekend THIS Weekend!!! See you there.
Thanks for checking us out.
Andy..
Labels:
Christmas,
Creatables,
Cuttlebug,
Embossing,
Grand Calibur,
Marianne Designs,
Nestabilities,
Sizzix,
Spellbinders
Subscribe to:
Post Comments (Atom)


Happy Birthday Andy - hope you get a chance to celebrate.
ReplyDeleteLove this card and the self-coloured details...great for Christmas or Winter birthdays.
Toni xx
Happy Birthday to you.
ReplyDeleteStunning card, love this idea.
Kim xXx
This is lovely Andy, and a belated Happy Birthday to you.
ReplyDeleteKaren xxx
Happy Happy birthday Andy,hope mums given you the day off!!! much love Becky ..xxx..
ReplyDelete