Last weekend it was Paul's (Joanne's Partner) Birthday.
 And here is the card I made for him..
There are lots of different elements in the make up of this card. So, I'll stop waffling on and just get on with it for a change..
 I started the project off by embossing a piece of Acetate using the Timepiece embossing folder.
 I then rubbed a Black StazOn Ink Pad over the de-bossed side of the image.
 Then, with some StazOn cleaner sprayed onto a kitchen towel,
 I rubbed off the excess Ink.
 This left just enough Ink in the groves of the embossing folder to highlight the “workings” of the Timepiece image, which was just the effect I was after? I then cut the face of the Timepiece out.
 On a piece of Slate Grey coloured Mirror card, I embossed the Renaissance embossing folder.
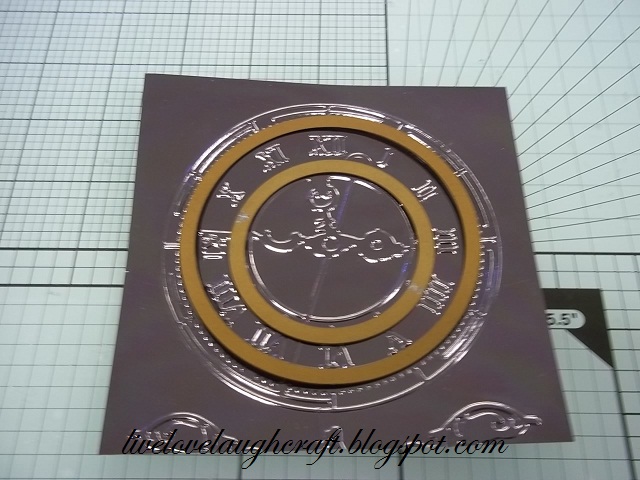 Placing two circle Spellbinder Nestabilities around the clock face
 and cut them out.
 The clock face was then stuck onto the embossed piece of Acetate.
 Next, I embossed part of the Workshop embossing folder onto the Grey Mirror card
 and hand cut two of the clock hands.
 I then join them together with a Brad.
 They were then added to the clock face and put to one side whilst I got on with the rest of the card.
As popular as Spellbinder Dies are, I guess one of their limitations is the thickness of card stock they will cut.. Problem solved! In conjunction with one of their preferred working partners, there are now pre cut shapes in Grey Board.. A much thicker and more robust material than the general card stock we are all used too. As they match their respective shapes exactly, you can manually cut your chosen papers to fit these shapes. Result!
 So, I took one of my favourite shapes, (Well, favourite for now, until the new Spellbinders come to Pinnacles in March!)
 and painted each element using Stream Adirondack Acrylic Paint.
 It took seconds to do, and was dry almost instantly, which meant I could add another colour straight away. This time I chose Pearl.
 Next I added a little bit of Black
 before finishing off with the Pearl again to give the cardboard cogs a worn, scratched, metallic look.
 Using the largest of the cogs first, I adhered a simple Peel off to the centre
 and then attached my clock face.
This part of the project complete, it's time to crack on with the base card for it to sit on.
 I took a piece of very thick Acetate and scored it into 3 equal pieces.
 Securing 1 of the sides underneath my chosen card stock, which left the other 2 sides to form my easel card.
 I then applied cog Peel Off's in a pattern so that they looked like they were all working together, but also leaving space to,
 firstly add my painted cardboard cogs,
 and also my clock face...
 Last but by no means least, my sentiment..I was really happy with how it all turned out and came together in the end, and it has a lot of potential for other "male" themed events.. Not to mention New Year cards and Scrapbook pages.. If I had had the time, and/or the inclination I would have loved to have got some Alcohol Inks to work on the Acetate and Mirror card to give a more Tim Holtz styl'ie finish to them. Oh well, it looks like we'll just have to have a play in our Time Holtz Day on the 10th March then won't we?!!
Thanks for checking us out, see you soon.
Andy.
Love, love, love it!!!
ReplyDeleteFab card Andy.
Toni xx
Amazing card, take care, Doreen x
ReplyDelete