In my last few posts I have shared with you ideas using the Summer Bloom range from Do Crafts.. Summer Bloom in packed full of items for Summer,
 but now we slip seamlessly into Winter... albeit only for a couple of day's...
 I stamped an image from a set of clear stamps from the Penelope & Percy range of products using Tuxedo Black Momento Ink.
 I then coloured the image in using a selection of Copic Pens and went over the whole image with some Glossy Accents, adding a little bit of Frosted Lace Stickles to the area beneath the character. I then put it to one side to dry.
Once it was dry I was ready to cut it out. I used a Nestabilitie Circle and a Cuttlebug.
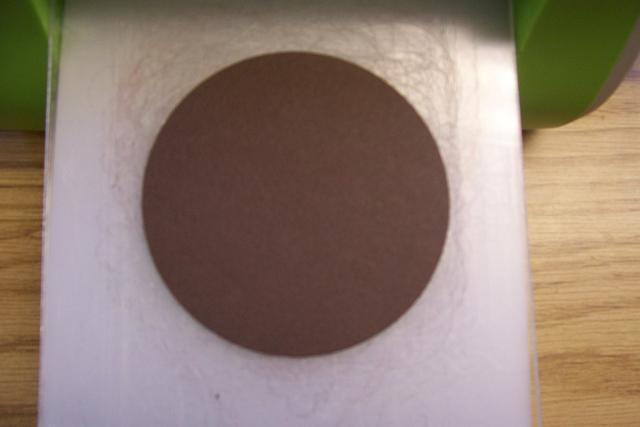
 Take a circle that will fit your image and place it onto your image with a Cuttlebug "A" plate and "C" plate underneath it.
 Place a Cuttlebug "B" plate on top and pass through your machine.
 I then cut out a larger circle using a Chocolate Brown card stock
 and stuck the two circles together.
 Adding a few Red Gem Stones as berries to really make the image sparkle, it is a Christmas card after all!!
I then cut two even larger circles,
 one in Chocolate Brown
 and one in White.
 I cut the White circle in half
 and then took my Martha Stewart Drippy Goo punch
 and punched along the straight edge and applied it to the Brown circle..
 I think it looks like cream running down a Christmas Pudding! I just love finding new ways to use a product other than perhaps it's intended use, don't you?!
 I cut out an embossed holly leaf from some Green card stock
 and applied it to the project with some Red Gem Stones.
 I took some Red card stock
 and using the Martha Stewart "Joy" border punch
 I punched into all four sides.
 Applied this to my base card.
 Finally adding the other two images on top.
So, there you have it, the first Crimbo card of the year! Plenty more from where that came from though! So if you're coming to the Christmas in July Weekend, see you there, if not I'll be posting some more ideas very soon.
Thanks for checking us out, see you soon..
Andy.
fab card
ReplyDeleteOh how cute is this card, I love the penguin but just imagine all the other characters and decoupage you can use as well. Can't wait to see all the other master peices you have created.
ReplyDeleteLyn (wed) x
He's lovely! (the penguin that is, sorry Andy!) Great card too x
ReplyDeleteWOW! That's awesome! I love how you put it all together and provided step by step details. THANK YOU!
ReplyDeleteOh wow, what a fab card...can't wait to see what else you have come up with during your 'playing' over recent week.
ReplyDeleteSee you Saturday.
Toni :o)
Great !!!
ReplyDelete