
and there she goes again!!! Hey Blogland. I came across this hilarious Digital Stamp the other day and knew I just had to to have it.. It's called Renie (No, not you Reene) and Scrappy! and is available from Imagenation. It is one of their Inklined Digital Stamps from the Wrinklies range. And at only £1 it was a bargain to boot!!
I had a bit of difficulty in actually planning the project as I wanted to keep the humor of the image but in a vintage/traditional mmmm what am I trying to say here! grown up way maybe!!
 So, I printed out my image and coloured it in with my Copic pens and then glazed it with some Glossy Accents.
 Once the image was dry I cut it out using the smallest circle from the Grand Circle Nestabilities Dies. I also cut the next sized Circle in some Pink Mirror card.
 And layered the two together.
 I then cut Four tags using the Spellbinders Fancy Tags Shape (S4-235) in some White card stock
 and cut them in half.
 Positioning each half piece around the circle images. At 12 & 6 O'clock,
 3 & 9
3 & 9 and then filling in the spaces.
 My intention was to use one of the new Martha Stewart Punch Around the Page sets French Scroll.
 But, after punching the corners and borders and then matt and layering it and adding my image,
 which ever way I turned it
 it didn't work for me,
 even Clown Fish would say it was "TOO BUSY!!".
 I even decided to chop the image up
 and see if that would calm it down!
 I did come up with some interesting concepts but I decided to leave well alone and use them on another project in the future!
 So, thinking cap on I decided to keep the circle theme going by making a circular card. I took the largest of the Grand Nestabilities Circles
 and added a folded A3 piece of card stock, leaving the die over hanging the spine of the card
 so that when it was cut the card would stay together.
 I then cut the second largest circle in some complementary card. Unfortunately these larger circles are too big to go through the Cuttlebug or the Big Shot so I had to use the Spellbinders Grand Calibur. A smaller project will allow you to use the smaller dies in the Grand Circles set through the Cuttlebug and Big Shot though!
 I stuck my stamped image to the Purple Circle, adding a frame of Silver Peel Offs around the edge.
 I also added the Peel Offs to the base card adding a complementary piece of Ribbon to hide the fold in the card,
 and then added the stamped image. I did the card this way round as the card was like a Wheeble and kept on wobbling to one side when the Ribbon was on the left!
I was thinking the project needed just a little something extra. So I decided to add a faux Rose.
 I used the Marianne Designs Flower (LR0128) through the Cuttlebug. To cut this die through the Cuttlebug you will need your A and B plates,
 your card and die
 and your C Plate.
 To emboss the image, turn the die over keeping your card stock within the die. These should be placed on an A and B plate.
 Add your Shim Mat and then your second B plate.
 You will need Three of these to make the flower.
 Take one of the flower shapes and snip to the centre of the image.
 Overlap the petals and stick together with some Glossy Accents.
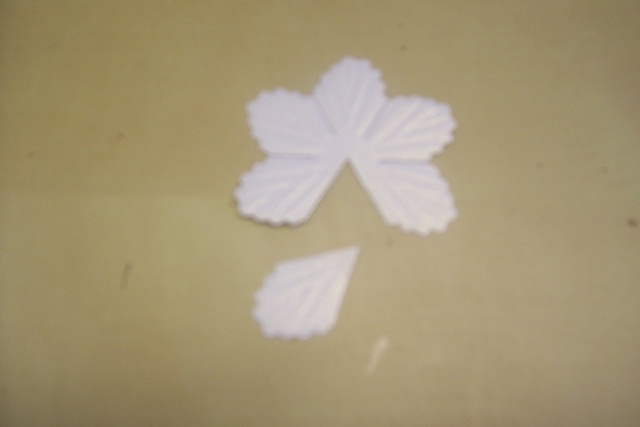 For the next layer cut off one petal completely, don't worry we will be using this piece shortly. Again overlap two of the petals together.
 For the third layer snip off Two petals and again overlap two of the petals and put to one side to dry.
 Take the cut off pieces
 and roll the double petal image into a cigar shape
 adding the single petal around it.
 And you should end up with these shapes.
 Snip off the base of each flower to allow each layer to sit comfortably inside each other and glue into place.Finally add the flower to your project!
This was a great image to use and I'm glad that I've managed to keep the humor in the card.
Thanks for checking us out.
See you soon.
@ndy
Love that you kept it simple in the end Andy, it looks lovely and the flower just sets it off a treat.
ReplyDeleteToni :o)
Well I saw this card in the making, and loved what I saw. But I must admit with the changes you have made, it has absolutely kept the humour of the card. I loved it in the shop and I love it on the blog. Well done you clever person.
ReplyDeleteLyn
Glad to see the finished article Andy and I was joking when I said I thought you were gonna call it Renee and that this is how I'd look soon(LOL). Nor did I realise the name of the image. I'm still giggling. Love how it turned out ... can you make me a badge please!!!! Well done
ReplyDeleteRenee x
Cricut blog candy - thanks for the chance! I love that you show your entire process, including what did not work. Wish I was in UK to visit the shop.
ReplyDeleteSo glad to see that others have to re-hash their creations because they don't look quite right. Love your use of the Spellbinders Fancy Tags, I'm so going to try that for myself. TFS. Looking forward to continuing inspiration.
ReplyDeleteCuttlebug, please. I love to hear/read the thought processes that take place in the creation of artwork. I also love the layout you created with the tag pieces around the circle and your ultimate resolution for a frame. TFS
ReplyDeletegreat tutorial and inspiration. Thank you so much for sharing the tutorial on maximising the punch usage...it is really helpful!
ReplyDeleteI am your new follower and will be hanging around your blog for more inspiration. Looking forward to your creative sharing.
crafting hugs, Heaney