 But still, here it is all the same!!
This weeks theme was Gate Fold cards.. A very simple fold but also very effective! Don't forget to hop on over to the Cuttlebug Spot to see what all the other Design Team Members came up with with this weeks theme.
 You know I love a little dimension to my projects and the Gate Fold allows just that! This is the inside of the card!!
 And here's a step by step. You'll be pleased to know it's nowhere near as long as my previous post!!
 I printed off a digi stamp I got from Mo Mannings Website. Coloured it in with Copic Pens and then glazed it with Glossy Accents.
 Once the image was dry I cut it out!!
 I then covered Two pieces of White card stock with some "Potter's Clay" Memento Ink. (There's got to be more uses for Memento Ink other than stamping your images for Pro Markers & Copics right!?)..
 Andy has a new Toy Alert!!! Finally!, I have managed to place my hands firmly on my own Spellbinders Grand Calibur Machine!! So I thought I'd share with all you new Grand Calibur owners how to pass your Embossing Folders through the machine.
 Take your Cutting plate
 and add your Embossing Folder and card stock.
 Then add a Cuttlebug B plate or Big Shot clear plate on top and pass through the machine.
 Simples!!! Cuttlebug and Big Shot owners can emboss the card stock in the usual way!
 Once I had embossed my two pieces of card stock using the Brick Embossing Folder, I then went over the embossed image again with the Potter's Clay Ink to highlight the embossing.
 For my base card I took a piece of card stock measuring 14" x 6". This was cut from an A3 (UK Size) piece of card stock.
 Using my Hougie board I scored a line at 3", 3.5", 4", 11" 11.5" & 12".
 And folded the card like this
 to create creases so that the card would stand up.
 Then I cut the brick embossed patterns to size and attached them to the front of the card.
 Now for the tunnel! I took the second smallest Oval from the Grand Oval Nestabilities Set, positioned it inside the card with the cutting side upwards, closing the gate fold card over it.
 I then completed the sandwich with the "cutting plate"
 and passed it through the machine.
 Unfortunately an impression of the Oval was left on the backside of the card, however covering it up with a Black piece of card stock would disguise this and add the darkness to the tunnel that I needed.. Result!!
 I added a couple of dots of Velcro Hook & Loop
 so that the card would remain closed.
 And then glued my character in to place.
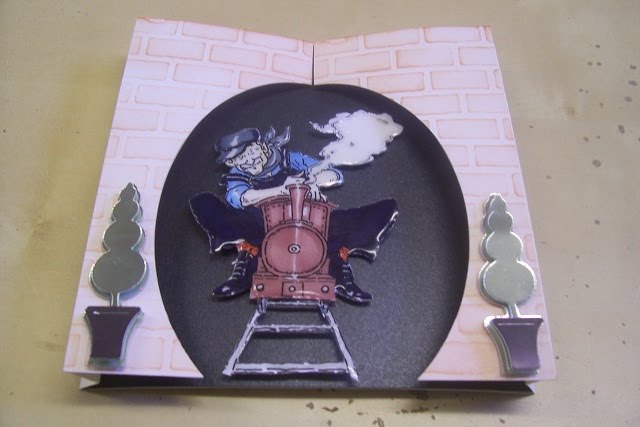 The front of the card was looking a little bland so I cut some Topiary Trees from the Joy's of the Season Cricut Cartridge and applied them to the front. Better, but it still needed a little something!!.
 I was thumbing through my selection of Nestabilities and came across Labels Six... Smoke... me thinks.. So I cut out a few of the smaller shapes onto Grey card stock
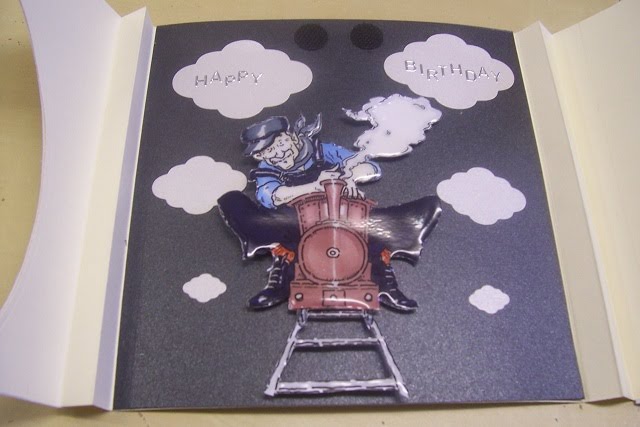 and positioned them inside and outside the card.
 And there you go..
Thanks for stopping by..
See you soon.
Andy
Great card Andy and I love the train image...mind you, this doesn't resemble in anyway shape or form the gatefold you were working on on Saturday LOL
ReplyDeleteLove the tunnel effect of this one.
Toni :o)
Hi Andy, you have amazed me once more, this is totally awesome!!! This is....like a little storybook inside a card!! This is gorgious! Loved how you explained what you did but most of all the tip for the card not to open! That is why I made the flower!! (which I loved anyways)
ReplyDeleteGood job, am proud to be with you on this team!
love
Jannie
Very creative, Andy! It's so much fun seeing a guy's take on crafting challenges. Love it! xxD
ReplyDeleteWow!! D/T brother, you have mastered yet another perfect challenge. Love your idea, and that train is surely blowing smoke!! LOL, awesome take on this challenge.
ReplyDeleteHugz, xx
~L~
CB D/T~sister!
This is fantastic I love the details & the tutorial!
ReplyDeleteGreat job, Andy! You are just so talented! I really do like the look of the embossed brick, too.
ReplyDeleteWendy T.
This is great, love the embossing!
ReplyDeletewhat a great card!!! love everything about it,
ReplyDeleteTFS,
Carol<><
Here we go again yet another fantastic card. The colouring in is spectacular. Where would you be able to buy such a great card. Certainly not on the high street. Keep them coming Andy.
ReplyDeleteLyn (wed)
I love your work. Great blog. This card is perfect for my husband. TFS
ReplyDeleteGreat card - what a fab way to use the gate-fold!
ReplyDeleteHelen x
This is very cool, what a great idea. I checked out where the image came from and thought she had some amazing images. I like how you incorporate stamping, cricutting and cuttlebugging into one project. TFS
ReplyDeletefabulous card , and thanks for the step by step too , Im going to try this one -Kate x
ReplyDeleteThis is a brilliant idea and a lovely card. It is sometimes hard to make male cards but you have created something that I think would really appeal.
ReplyDeleteKim xXx
Cuttlebug, please. What a wonderful card... have never seen anything remotely like it before. You have wonderfully original ideas. When I saw you place the die to cut the outside flaps, I thought it was going to leave marks on the base card - what a great solution you had that really adds the depth needed for this image. Love your instructions you give for your works of art. TFS
ReplyDeleteWhat a lovely idea for a Man's card, this is one for my "to do" list, thank you for the idea.
ReplyDelete