Wednesday, 12 August 2015

Poinsettia Easel....

Hi folks... A little bit of an "OTT" project for today’s Creative Expressions Design Team post. But, whilst the creative juices are flowing I'm ganna ride the wave...

I think I've put to good use some of the Design Team stamps I was sent, and if you fancy giving this, or something similar a go, then here’s a little step by step.

To start off with I took a piece of Black card stock and applied my Anti Static Bag to it. This is because I planned to add some Mica Powder and the Anti Static Bag will dry out the card stock and hopefully prevent the Mica Powder from sticking to areas you don't want it to, I.E sticky finger prints etc... You can also use the Anti Static Bag if you are using Embossing Powders.

Next, Ink Up your chosen Stamp with either Perfect Medium or VersaMark and stamp the image onto the Black card stock.

If you weren't going to apply any Mica Powder or Embossing Powder then this image will always stay there. It will of course dry, but not disappear, so would make a good "subtle" background technique with any of your Stamps.
Anyhoo, as I said, my plan was to use Mica Powder, and seeing as Phill Martins new "Frosty" colours (Aqua, Blossom, Jade, Mink, Sky, & Heather) have now arrived I thought I's put them through their paces...

Starting off with Frosty Jade..

Unfortunately my photography skills don't show off the subtle Green tinge to the image, but I'm sure you get the jist?!

Don't forget to seal your image with Spray and Shine or a generic Hairspray to stop the Mica from rubbing off.. One coat is sufficient to protect the Mica,

but I like to give it 3 coats to not only protect it but to give it a nice shine too.. "Personal preference really"!!

Repeat the process with all of your chosen images..

Once dry, matt and layer the images with your choice of card stock, again I have chosen to round the edges using an "Inverted" Corner Rounder Punch..

Adding the images to an Easel Card I had prepared.
Obviously it was going to need a little bit of "tarting" up,

so I prepared a few Poinsettia bunches using the Sue Wilson Classic Poinsettia and Holly Sprays Dies. The Poinsettias have been sprayed with some Crafter's Companion Spray and Sparkle, just to give them some of that good old Christmas Sparkle. The Holly Sprays which were cut out on Black Card Stock and have had a little Autumn Bronze, Chic Pumpkin and Enchanted Gold Gilding Wax applied to them before adding some Cosmic Shimmer Berry Sparkle Glue for the Berries..

And there you go.. Yes, very OTT but for those "Special" Christmas card this year I think it's well worth it.. Well, I guess the fact that a family member has already laid claim to it for their card this year, a job "jobbed" me thinks!!
Thanks for checking us out.
See you soon.
Andy.

Sentimentally Yours Stamp - SYCHHB Christmas Holly Background
Creative Expressions Stamp - UMS635 T'was The Night, UMS637 Florentine Background


Wednesday, 5 August 2015

12 Days of Christmas Advent Boxes...

... Hi Folks.. First things first... It's "Happy Birthday" to Pinnacles most precious members of staff.. I know you all come to visit her primarily, and the goodies in the shop come a very close second!!

Can you believe Holly turns Four Today!! Every day she has been with us has been a true blessing, and I can't imagine a day without her by my side, mostly because she never leaves it!! Everywhere I go, she goes too. I'm sure she sleeps with one eye open just in case!! Anyway, Happy Birthday Baby Girl xxxxx
Right, on with today’s Creative Expressions Design Team project...

A new Month means new goodies have been sent for me to "play" with... and here's what I have come up with for today.

I have used some of the sheets from the new 8"x8" Paper Pad designed by Jonathan Lockwood..

Cutting all of the squares to size and then Matt and Layering them with some Mirror card...
I knew where I was intending on going with this project, namely an Advent Calendar, but I really think I was going around it the loooooooong way, very long to be honest! I was intending on making each box individually!! Which would have probably taken my right up to Christmas to finish..

Step in the voice of reason by way of Toni who pointed out to me the Boxes I made last year using the WeRMemory Keepers Envelope Punch Board...
And before you knew it I was a churning them out, because they really do take no time at all to do..
Here's a step by step guide if you wish to make some of your own..

Take a piece of light weight card or paper and cut it 8 1/2" x 6"

With a score board, place the card width ways (8 1/2" way) and score at 2", 4", 6" & 8"

turn the card around (6" way) and score at 1", 1 1/2", 2" & 4"

Fold all of your score lines one way

and then the other, the important thing being that all of your folds should be "Mountain" folds

apart from the score line at 1 1/2" which should be a "Valley" fold.

Next, cut off the very small tab on the bottom of the piece of card,

and snip between each of the squares next to it. This will create the base of the base of the box.

To allow the neck of the box to "concertina", take your Envelope Punch Board and fold over the small tab at one end of the piece of card, place it under the punch element of the board. You should notice that the "little Blue foot" just rests on the 1" scored line, or you could just place the card at the 1 1/2" marker at the back of the board.

And punch through.

This will create a little "oval" shape which will allow the neck of the box to spring up and down.

Fold the next score line over and repeat,

and again at the next score line,

and once more.

For the last section, there is nothing to fold over, so just place under the punch element and punch through.

Now all's left to do is apply some tape to the little flap at the side to secure the back

and then fold in the bottom flaps, taping them as you go to secure the bottom.

This is how the neck of the box should be, it's important that it’s a "Valley" fold for this reason...
Now for the lid.

Cut a piece of card stock 4 1/16"th x 4 1/16"th

score the piece of card at 1" on all sides.

Snip in on each of the squared edges

and then mitre the corners...

Fold all of the score lines and then add tape to the coloured side of the little triangular area and stick them together..

And there you go!!
Personally, when making these I tend to use a random patterned card stock, or at least one that doesn't matter which way is the right way up.

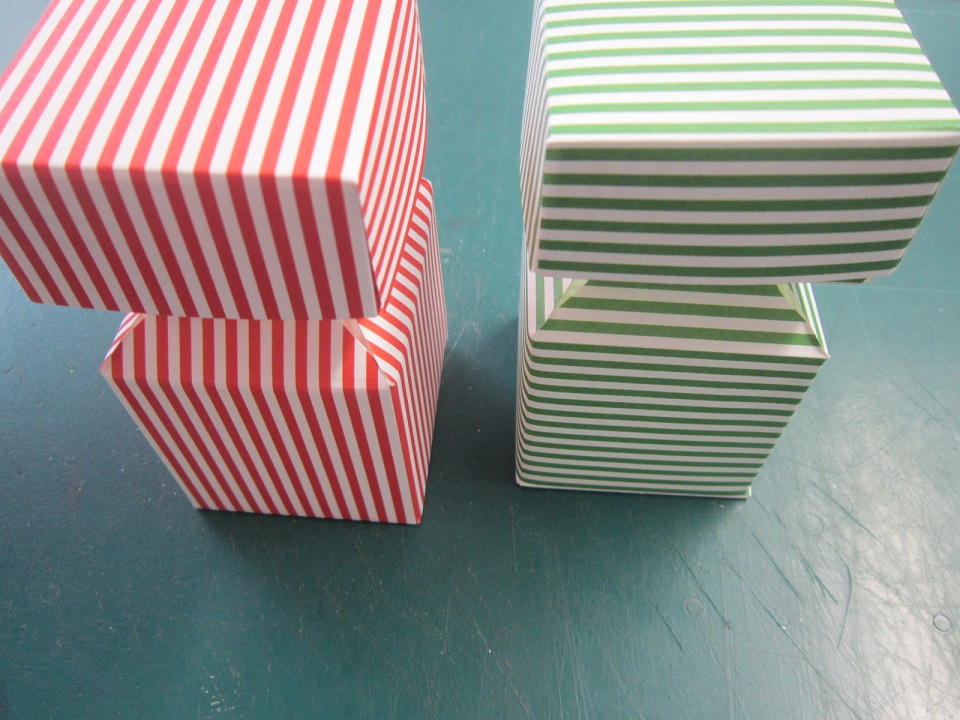
However, if you do choose to use one with a specific design on it, such as stripes, to get them the right way up, cut the card with the 8 1/2" edge as you wish the box to appear.. I.E as shown here with the RED paper, not the Green...

Cut the way the Red is, the stripes of the box will be vertical as opposed to the Horizontal Green ones, depends what you're after really!

That said, whatever way you cut the lid, you will always get two sides going the right way, and two going the wrong way!! Nature of the beast I'm afraid...

Thanks for checking us out, see you soon.
Andy..

Hoogie Board
WeRMemory Keepers Envelope Punch Board

Wednesday, 29 July 2015

Christmas Flip Flap....

Hi folks.. Really wasn't sure what to call the title of today’s Creative Expressions Design Team Post, so I've gone with "Flip Flap" because that's exactly the sound the card makes when it closes!!

It really is quite an unusual design and I'm sure I'm not the first person to have made something similar but I must say, I do like its quirkiness....

and really makes a truly individual and unique card

and also, and this is its main selling point, takes no time at all to do, which, when it comes to churning out your Chrimbo cards is a phenomenal bonus!!
So, if you fancy giving it or something similar a go here's a quick step by step for you..
This particular version was really based around the size of the stamps I had chosen to use. Obviously you could make one bigger or smaller.

So, I cut three strips of card, high enough to incorporate each stamp image, and also long enough to take the image but also allowing an inch to create a flap.

Score each strip,

the top and the bottom one on the left hand side

and the one in the middle on the right hand side.

Take a piece of card which will become the back of the project

and adhere the flaps of each of the strips to the back of it.

Next, add a matt of your chosen backing card stock, I've decorated mine with an inverted corner rounder punch.

On a separate piece of card cut slightly smaller than the Black piece used to Matt and Layer, stamp your chosen images,

rounding the corners as before and then Matting them onto the Black card stock.

Decorating the Holly images with some Clear Dazzler Gems coloured Red with a ProMarker Pen, or you could just use some pre coloured Red Gems, makes sense really!!

Now, this is something I don't think I have ever done before in my crafting lifetime. Stamped a sentiment!! But, seeing as I had one of Phill Martin's new stamp sets to hand, it seemed a shame not to put it to good use...

and makes for some light reading once the card is open..

And there you go.. Far from the norm I grant you, but also very unique too and hopefully will make for some interesting "crafting makes" for yourself too?!!
Thanks for checking us out.
See you soon.
Andy.