Friday, 27 July 2012

Let the games begin....

Today's the day folks.. 7 Years in the planning.. The eyes of the world descend on our great Capital city tonight for the opening ceremony of the 2012 London Olympic Games.. I for one will be glued to my plasma screen at 9 O'clock to watch what has been billed as an opening ceremony to match any other (except Beijing 2008!).
Good Luck Team GB.... Today's project has a very, and I do mean very, tenuous Olympic link...
Tenuous in the fact that each of the cards has been made in the colours of the Olympic rings... So we have one in Blue,
Black,
Red,
Gold/Yellow
and Green
Oh and one for luck in White, just because!....
Pretty simple Crimbo cards and perhaps work better in some colour ways that others, but I just fancied joining in with the Olympic spirit.. Love it or hate it, it's ganna be here for a while... Enjoy the ceremony tonight folks.. Thanks for checking us out, see you soon.. Andy.

Wednesday, 25 July 2012

Where do you get yours?

...Inspiration that is!... This was a simple little pic I took outside the shop yesterday morning!!
The bunting has been up since the Jubilee celebrations back in June and is set to stay at least until after the Olympics.. The thing is, it used to be RED, White and Blue. But I think with all of the rain we have had recently and now this wonderful warm sunshine, the Red has been washed, or bleached away!! Leaving a lovely Blue and White contrast against the clear Blue Sky... So, this is what inspired me for today's project...
And where will you get your next bit of inspo from? Thanks for checking us out and have a great day.. See you soon. Andy..

Tuesday, 24 July 2012

My moment of glory....

Hi Guys... My moment of Glory!!
Well, really this is as near as I am going to get to being an Olympian... And YES it is real! But, alas it was not me who was performing the leg of Olympic Tourch relay as it passed though Essex... But at least I can say I held it... See you soon.. Andy..

Monday, 23 July 2012

Sunshine on a.....

Well, "SUNNY day" actually.. Hi guy's.. That was not the original title for today's post.. But, for most of us here in the south of the UK, its ganna be "Scorchio" for the next few days.. See, I did put a little sunshine in my suitcase and brought it all the way home with me....
So, here is today's little offering.. A nice little project for any of your friends who really brighten up your day, just for being who they are!! I have several "nut, nut" friends who, if they weren’t who they were then they probably wouldn't be half as much fun!! It's been absolutely ages since I have done a little bit of colouring in.. I guess it's weird how we all go through stages of "milking" a particular crafting technique until something else comes along to attract our attention and then we move on.. I suppose that's what makes the crafting world go around and also why we all love it sooooo much.. You just can't get bored with it!!!
So, here is my first image.. Coloured in using my wonderful Copic pens and then glazed with Glossy Accents.
Once the image had dried, I trimmed it to size and then mounted it on to a piece of card stock which had been cut out using the Personal Impressions/Spellbinders Die; Reversed Scallop Rectangles (CPI-004).
This, in turn was mounted onto my prepared base card
and the project was finished off with a "rather apt" sentiment.... Right, a few bit's and bob's to finish off this morning for Club Members Weekend, which starts this Friday BTW, and then the rest of the day is all mine... It's too nice to be inside; some alfresco crafting may be... We'll see.. Enjoy your day whatever you're up to. Thanks for checking us out. See you soon. Andy.

Friday, 20 July 2012

A little bit of masking...

Hi guy's.. Just a quick and simple card today, just to help me get back into the swing of things...
I'm sure you'll understand that after a holiday of lazing around in the sun, it takes some getting used to to get back into a "normal" routine again!!
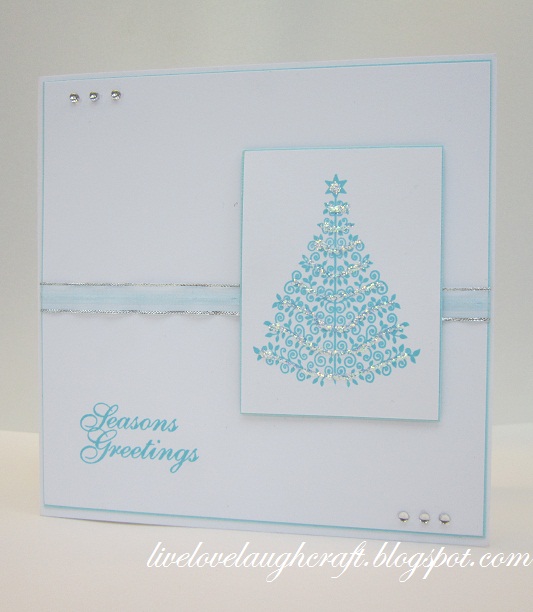
I started this project off by stamping my image using Aquamarine Archival Ink. I love this Tree stamp, but for this particular project I didn't want the base part of the tree.
So, I cut the bottom away to use as a mask.
Placing it over the bottom of my stamp
and then inking up my image again.
So that this time when I stamp it I only get the part of the stamp that I want... Now, I said it was going to be quick and simple, and if you are prepping your own Christmas cards, you'll appreciate that quick, simple and effective is the way to go for, shall we say, your everyday random Christmas cards... This will, hopefully, leave some time nearer Christmas for your extra special family and friend ones.....
So, the stamped image was mounted onto my prepared base card with the addition of some Stickles Glitter Glue
and some jimmy Gems to fill in the spaces in the corners... Love this Aquamarine colour as it gives this card such a clean crisp fresh feel.. bbbbrrrrrr...
I also gave it a go in a slightly warmer colour way.. Creating the base card in the same way as before.
But, as I didn't have any Dark Blue Gems at hand, I coloured some Clear ones with a Copic Pen to tie them into the project.
You could also do this with your Pro Marker Pens... Oh, the possibilities...!
So, there we go.. Another 2 Crimbo cards to add to the pile.... Thanks for checking us out. Have a great weekend... See you soon.. Andy..

Tuesday, 17 July 2012

I'm Back....

Hi gang.. Well, if you've been wondering why there have been no blog updates recently? It's because I took myself off on a little, and dare I say it, "much needed" hollywangles...
Just got back from wonderful Gran Canaria..
Whilst those of your here in the UK were suffering with the rain, I have to admit the weather in Gran Canaria just got hotter,
and hotter
and hotter
until it hit scorchio!! But, I'm back now. Batteries all fully recharged and ready to get some crafting done.. So watch this space... Oh, and the best part of coming home....
"Nuff said" mwah.. God I missed her!!! See you all soon.. Andy...

Monday, 2 July 2012

Getting more out of your Dies...

Hi everyone. How you doing? Today I'm going to share with you another technique used in our recent demo day.. The day itself was designed to encourage you to get the most out of your die cutting machines and the dies themselves.. Basically "to use a product in a way other than it's intended use"... I think I am going to have this phrase etched onto my head stone one day as I seem to use it so often! So, here’s the first sample using this technique. It is using a die as a Mask, a template and an additional embossing shape..
So, shall we get on with it?! To start off with you just need to get prepared.. So, using 4 pieces of 290gsm card stock cut to the same size I cut out my shape. In this case I have used the Second Largest Die from the Spellbinders set, Classic Ovals Large (S4-110).
Once you have done this four times through your machine you will end up with 3 negative images, which will become your template, 3 positive images which will become your additional embossing template and 2 masks, one a positive image and one a negative image.
To complete the set up of your template, take 3 of your negative images and stick them together. This will form quite a thick template.
The remaining negative image will become your mask. As you can see, I have labelled them up so I know what I am working with.
Stick 3 of your positive images together and this will become your additional embossing shape.. The last single positive image again could be used as a separate mask shape.. Now you are all prepared it's time to play.. The above procedure will work for most of your dies.. So, it really is a great way to get the most out of them. And once you have put the work into getting the templates and mask made, you won't have to do it again unless or until they start to deteriorate... Which shouldn't be for quite a while I imaging!? So, how do we use them? For this particular project I used the Cuttlebug, but you will be able to use this technique in the Grand Calibur and Big Shot machines and in future posts I will share with you the plate combinations you will need to pass them through your machines...
So, for the Cuttlebug, insert your card stock into your Embossing Folder as normal.. Now, this is where the sandwich changes slightly from what you are used to. Place the Embossing Folder directly onto your A Plate,
followed by your template over the top of the outside of the Folder.
Finish the sandwich off with your C plate.. Now, your's doesn't have to be as scratched as mine, but if you use it as much as I do then it most probably will be scratched to the hilt!
Once you have passed it through your machine, hopefully you will notice that the embossing has occurred around the edges of the card and not in the middle..
A little bit of Ink really shows this up.. This was one of the very first times I had attempted this technique and although very happy with the results I wanted more!! So, using the positive images I had stuck together I wanted to create a deeper embossed shape in the middle...
To do this, lay your Tan Mat onto your Cuttlebug A plate
add your embossed card stock with the positive image positioned back into the Oval area created when we first embossed the Folder
and complete the sandwich with your C plate. You may be wondering why I have put the sandwich together in this order? I.E, why is the Tan Mat down first, shouldn't it be nearer the top of the sandwich? Good call!! The reason is a simple one.. If the Tan Mat is nearer the top of the sandwich then I cannot see to make sure that my Oval template is in the correct position and hasn't moved.. Doing it the other way round I can see what I am doing.. Remember, as long as the filling for the sandwich is in the correct order, it doesn't make any difference which way round you do it.. For this technique anyway.. I hope that makes sense? Obviously I could always tape the die down too...
So, once embossed the inner oval is now slightly deeper..
And with a little more ink it makes it really stand out eh!
With your mask, which we created earlier and is simply a piece of card with an Oval cut out of it, place it over the Oval area
and stamp your image..
The mask keeps the image within the Oval area. Cool eh?!
Then mount your image onto your base card and viola!!! Love using this technique and it really has added value to my dies.. Go give it a go and see what you can create.. Have a great day and thanks for checking us out... See you soon.. Andy.