Hi folks... I've gone "reet" grungy for today's Creative Expressions Design Team project.. And I think, as the title of today’s post suggests, it's another Marmite project, you'll either like it or not..
I'm still taking some convincing! But, as they say, it's all about the journey, not the destination! And I certainly enjoyed the process of making it, if not the finished result...
And considering it started off as just a bit of White and Black card stock the results are pretty cool...
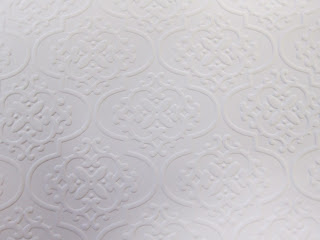
I stated off by embossing a piece of White card stock using the Tapestry (EF-012) Embossing Folder from Creative Expressions.
Placing it in an old box
and selection a range of Spritzing Inks.
The results of spritzing the Inks are always going to vary,
depending on how much of each colour you use..
But carry on until you are relatively happy with the results.. They final colour will still change somewhat as the project dries.
To encourage the project to dry quicker, place it onto a piece of kitchen towel
and place another piece on top.
Take an iron and iron it dry.
As the water from the Spritzing Inks evaporates not only will the project dry but will probably also lighten in colour slightly.
Once dry you can add some colour to highlight the embossing
use what you have
as each different type of Ink will add its own element to the project.
To seal "all" of this "Inkage" you can apply some clear Embossing Powder.
This also adds a nice sheen to the design.
I have in mind to use this project as a book cover at some stage so I wanted to create some sort of binding/hinge effect.
I cut 2 Borders from the Sue Wilson New York Collection Border, Corner & Tags Die Set (CED4102),
coloured them with Graceful Peach Gilding Wax
and applied them to the base card. "Says to me rusty old hinge/spine don't you think?"
I had a couple of Gilded Hearts left over from a previous project,
so rather than let them go to waste I popped them onto the Borders. Not quite sure why, but I do think that it adds to the effect somehow!
I then added a sentiment from the Couture Creations Vintage Rose Garden Paper Collection. I glazed it with Glossy Accents to give it a glazed effect..
This is where I think I should have stopped, but I went ahead and added another sentiment, it's only on foam pads, so it can easily be removed for when I am ready to create my book for this cover to go onto...
So, all in all a fun, if messy project to get your teeth into.. And I kinda like messy!!
Thanks for checking us out.
See you soon.
Andy.
Wednesday, 25 March 2015
Wednesday, 18 March 2015
Looks can be deceptive...
Hi folks... Creative Expressions Design Team post time again today...
Now, as the title of today’s post might suggest, all is not as it seems on today’s project...
Do you see a heavy metal embellishment on the card? or a very light weight piece of card which has had Gilding Wax applied to it to give it the effect of a piece of metal?
Of course it's the latter!
You maybe even more surprised to find out that it is in fact Graceful Peach and Graceful Mustard Gilding Waxes which have given this specific Silvery/Gold colour combo and not actually Silver and Gold Gilding Wax...
Here's a quick step by step if you fancy giving this project or something similar a go..
To start with, I cut out my image using Black Card Stock. I chose Black because I know that it interferes with some of the colours of Gilding Wax.. Generally, when the Gilding Wax is used on White Card Stock what you see is what you get, but on Black Card Stock you just have to wait and see.. In the past I have tried it with Pink and Purple, and the Pink came out Purple and the Purple came out Pink!! Go figure!!!
Anyway, adding Graceful Peach to the image gives it a Silver, almost Pewter effect...
And a good "buff" will really bring it to life...
Although I was happy with the Silver effect I wanted to tone it down a little bit so I added a touch of Graceful Mustard (awful name! Old Gold might be a little more appropriate!) oopps, forgot to take a photo as this stage though, but I'm sure you'll notice the effect from the finished card!
Speaking of which, I prepped the card using a Sentiment from the Phill Martin Set of Stamps "SYBS2C Baroque Sentiments 2 Collection"
and then added the embellishments..
Very Happy with the outcome of this one!! makes a change!!
Thanks for checking us out, see you soon.
Andy.
Cosmic Shimmer Graceful Peach Gilding Wax
Cosmic Shimmer Graceful Mustard Gilding Wax
Phill Martin Baroque Sentiment 2 Collection SYBS2C
Wednesday, 11 March 2015
Easter is a coming....
Hi folks... Time for something a little different from me for today’s Creative Expressions Design Team Post..
A "Novelty" card...
I really am not a fan of these types of projects.. just not my style or cup of tea! But, when the mood takes you in that direction you just have to kinda go with it... and when all said and done it does put to good use some Dies, so that can't all be bad..
To make the basket I used the Striped Sue Wilson Weaving Die
which really did give the desired effect for the wicker basket
trimming the edges
and then cutting it into shape
to complete the basket effect.
One of the Dies I was given to use this Month was one of Couture Creations new Hearts...
Trying to think outside the box a little rather than just producing heart after heart etc... I cut one out
and then cut into it
using a Spellbinders Oval Die.
If you position these well, you can get at least 3 out of one Heart...
Next, I cut out the Oval again, this time using some Silver Mirror card
and stuck the "filigree" image over the top to produce something on a par with an "Easter Egg"?
I did this in several "spring" type shades of card stock and positioned them into the basket...
Created a handle for the basket
and finished it off with a ribbon and a flower which was made using the Sue Wilson Delicate Daisies Die...
Well, it says a basket full of choccie eggs to me!! "Hoppy Easter" as they say!!
Actually, the design isn't that bad!! It has allowed me to make a version for my Mums Mothers Day Card on Sunday....
Thanks for checking us out.
See you soon.
Andy.
Friday, 6 March 2015
A little bit of texture....
Hi folks...
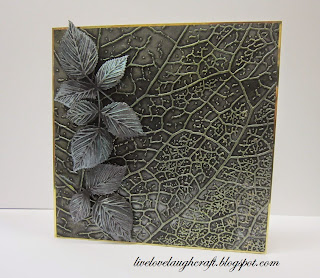
Been having a little play with some of our new Die'sire Texture Embossing Folders... and a little bit of Gilding Wax.
I think the results speak for themselves...
Just needs a sentiment when the time is right and then it's complete!!
More play time today me thinks.
Thanks for checking us out.
See you soon
Andy.
Labels:
Cut n' Boss,
eBosser,
Embossing,
Gilding Wax,
Grand Calibur
Subscribe to:
Posts (Atom)