 This Month's theme has been all about embellishments. And Today's post in particular is about thread, cord, twine, string etc etc... Hence the title of Today's post, "All tied up!"
 I've had this project in my mind for ages, ever since I knew that the Quarter Note Cricut cartridge was coming to the UK!! It's been exclusive to Michael's in the States for a while but is now freely available to all of us in Europe!!
This cartridge has answered a big gap in the Cricut Cartridge library for all things musical and is perfect for those that are talented enough to actually play an instrument or for us tone deaf mortals who just admire their gift!!
 I started off by cutting out a couple of the Cello images and layering them on top of each other to give some dimension.
 Oooops, it wasn't until I had stuck them together that I realised that the white side of the Mirror card would be shown.
 So I cut more images, backing White to White so that the Gold Mirror Card would show both sides.
 I did this for all four instruments.. And put them to one side to dry whilst I got on with making my tied up musical scrolls.
 I embossed a few sheets of pearlised paper with the Margi's Melody's Embossing Folder or you could use Allegro.
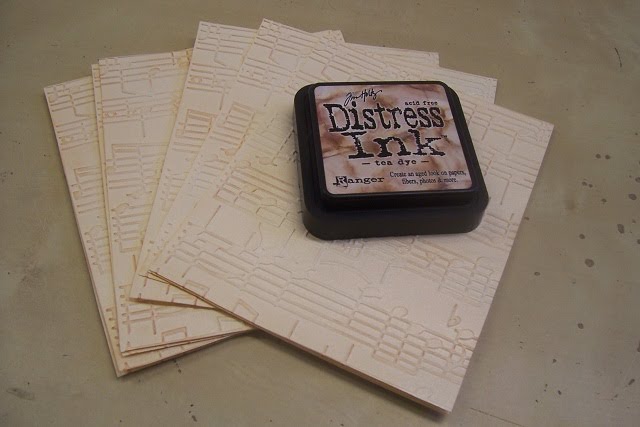 I then went over the embossed images using Tea Dye Distressing Ink to highlight the embossing and to give the final scrolls a worn/vintage/distressed look.
 The 5" x 7" sheets were far too big to be used whole so I chopped them in half
 before rolling them up
 and tying them up
 with some Hemp Cord.
I wanted to mount the Cello's and musical scrolls on to a platform of some sort and the only thing of thickness I had was some Mount Board which was White on one side and adhesive on the other, so therefore it needed to be covered.
 I cut some Mirror Card to size and decided to emboss with the Margie's Melody's Folder to keep to the theme.
 Oucha magaucha!! The embossing Folder was too small, or was the card stock to big?!
 No worries I thought! The gate on the Cuttlebug is about 6" wide so I can link the embossing! To do this through the Cuttlebug, place your Embossing Folder and card stock on top of an A and B plate
 and then add your No Shims Mat and pass through the machine..
 Adding the No Shims Mat instead of another B plates generally allows the Folder to emboss but doesn't leave a definitive embossed line when you line up your next section. If you want a deeper embossed image you could always add a piece of card under the Shims Mat.
 Now to emboss the second section! Arrrgghh! What was I on when I was doing this!! Although the folder and the card fit one way, when embossing the second part of the card it was far too wide for the Cuttlebug gate, and as the Embossing Folder was one of the larger 5" x 7" Folder’s I couldn't even turn it sides ways..
 Nothing else for it other than to use the Grand Calibur Machine.. I knew I had got this machine for another reason other than to use the Grand Spellbinder Dies...!
The much large gate on this machine allows you to put your embossing Folders in any which way you choose!
 Et viola!!
 I mounted the now embossed Gold Mirror Card on to the mount board and layered them together with some Pinflair Silicone Glue, leaving quite a space between the layers for some dimension to the project.
 Once the Silicone had started to dry I added my Cello's. Attaching them to some of the Scroll's for stability.
 I also had to use a trusty pair of Scissors to balance one of the instruments until the Glue started to dry...
 And there you go... Ok, more of a Project/Gift than a card, but would be perfect for someone who had just passed their Grade Exams or just something a little different for a Music lover... This has been a great challenge set by Nilda over at the Cuttlebug Spot, so good that I actually made three projects which I will share with you throughout the next couple of posts.... Don't forget to hop on over to the Cuttlebug Spot to see what my fellow DT members have come up with...
Thanks for checking us out.
See you soon..
Andy.
Wow! Thar looks like a masterpiece,
ReplyDeleteHey, why was you worrying...the photos were a heck of a lot better than I would ever manage LOL
ReplyDeleteHaving seen this in real life I have to say that this is one amazing piece of crafting.
Toni :o)
WOW Andy! This is truly AMAZING!!!! Looks like I may be having to invest in Quarter Note. Fabulous project! xxD
ReplyDeleteThis is so amazing, Andy! You are the maestro for sure! Thanks for sharing how you made this one!
ReplyDeleteAndy.............you have taken my breath away, this is soooooooooo amazingly beautiful!!! All the detail you have put into it, it is simply amazing!!
ReplyDeleteProud to be on the team with you!!!!!!!!
love
Jannie
A-maz-ing - your project obviously and the fact that i might have finally worked out how to post a comment
ReplyDeleteWow, what an amazing project. Fantastic.
ReplyDeleteYou've hit a high C with this one, Andy.
ReplyDeletePJ(Jessie Adams)
I saw this in the shop and it is FABULICIOUS!
ReplyDeleteBeautiful - will make a lovely keepsake for someone!
ReplyDeleteHelen x