
Hi Blogland. First of all, "Happy St. Patrick's Day" to those of you who celebrate.. I myself will be partaking in a pint or two of the Black Stuff this weekend, not tonight though as it is a school night!! I have learnt my lesson over the years! Haven't we all..!?
As I said in my last post, the current Cuttlebug Spot Design Team's Challenge this week was to use Twine, Thread etc on our projects...
I had a blast with this theme and made more than one project, so today I wanted to share with you another one....
 Don't ask where the inspo came from, I have no idea.. It just popped into my head and happened quite organically.. A very rare occurrence!!!
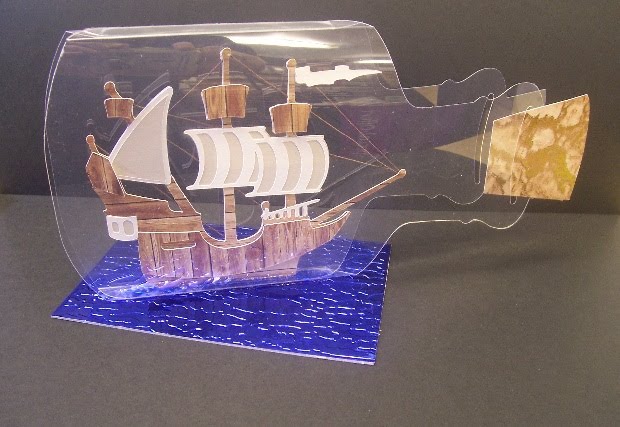
 I started off by cutting out a couple of the ship shapes (ship shape, ha, funny!) from the Wrap it up Cricut Cartridge using some wood panel effect card stock. I "flipped" one of the images so that I could use it as a backing when the two images were put together.
 I then cut out all the layers for the image and stuck them to the ship.
 The image looked great I thought, and the colours seemed to work really well together. It was at this point that creativity kicked into over drive.. As the theme was Twine etc, I thought how about some rigging! OK, for all of you nautical folk out there the rigging might not be in the right place but it really does finish the ship off!!
I think a shape like this has many possibilities for male themed projects, so why not a ship in a Bottle!!
Searching my Gypsy for a Bottle image I found a perfect one on the "An Ocean of Word's" Cartridge. However, I don't have this cartridge as it wasn't one that I thought I would get much use out of..
 So I kept searching and found a Bottle on the Cricut Lite Cartridge, Splish Splash... I had to manipulate the image a bit on my Gypsy to get the exact shape and size I needed, and then cut it out twice in some thick Acetate..
 I scored 1/2" along each of the sides of the bottle
 and stuck the sides together with some high tac clear tape.
 Popping the Ship inside to make sure it all fitted together
 before holding it in place with some Silicone Gel.
 For the Bottle to sit on I embossed a piece of Dark Blue Mirror card through the Cuttlebug using the Bark Embossing Folder from Creative Expressions
 and added it to a piece of Grey Board to make a strong base and then added the Bottle with some Silicone Gel
 and erecting a make do stand until the Gel had dried enough to support the Bottle.
 Ooops, nearly forgot the cork, which makes the project look like what it is supposed to be...
 And there you go, a ship in a bottle, cool eh....
Thanks for checking us out..
See you soon.
Andy.
Wooooooooooooooow!!!
ReplyDeleteMuch better than the pic of a boat over on my blog LOL
This is fab Andy and the final piece developed beautifully from your original cut-out.
Remember the weekend is school nights too...LOL
Toni :o)
What an imagination you have!!!! Your projects are always A+ and inspiring.
ReplyDeleteGood lord I wish I had half of your creativity. This is fantastic!
ReplyDeleteI just wish I could come up with a better choice of words for your work but "STUNNING" really does fit the bill for this masterpiece. I know I saw it in the making, but had no idea it was going to end up looking as fab as this. Clever boy you can have a star for this and also be milk monitor for the week.
ReplyDeleteLyn (wed)
I'm pleased to see the finished subject after seeing it in various stages. Just looks ship shape :-)
ReplyDeleteGreat project!
ReplyDeleteWow, what a neat project!
ReplyDeleteLove that wood-like paper.
PJ(Jessie Adams)
You are awesome mate!
ReplyDeleteWow - this is fabulous Andy!
ReplyDeleteHelen x