Monday 30 August 2010

And the winner is....

Happy Bank Holiday everyone! Well, to all our followers in the UK anyway, perhaps everyone else has to go to work this Monday? Including me!!First things first, the winner, drawn at random, of the Independence Day Cricut Cartridge is.....BRENDA, from Michigan in the US. Well Done & Congratulations Brenda, the cartridge will be winging it's way to you very shortly. Hop on over to Brenda's Blog and check out some of her fantastic work.. It's very inspiring..
So, on to today's project.. In my last post I shared with you an idea using some left overs from another project, well I still have a few of those pears left over, so here's another project.It could be used as a "Get Well" or "Thinking of you" card, the sentiment says's it all! "When life serves you lemons, make lemonade". And here's a step by step..I cut 3 Lemons, from the Preserves Cricut Cartridge, using the Lid function @ 3" and took a selection of Adirondack Inksand coloured them.
Yep! they look like little yellow fish!, so if you have a project that ever calls for little yellow fish, now you know where to get them..Once coloured, I then glazed them with Glossy Accents.I cut a Colander from the From My Kitchen Cricut Cartridge using the Blackout Function at 4 3/4",attached high tac tape to the back
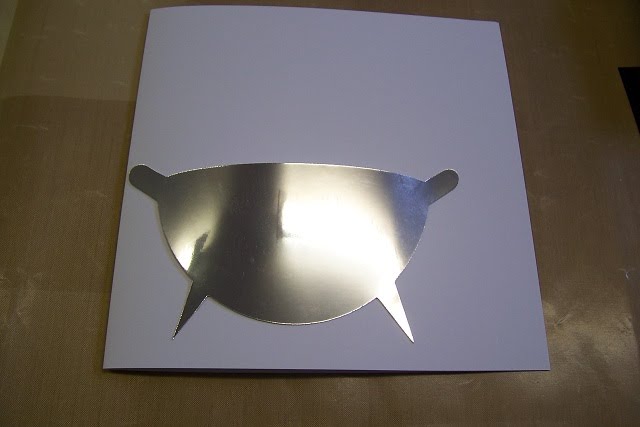
and applied it to my card, I domed the image slightly to give it some dimension.I embossed a strip of Gold Mirror card using another folder from the Preserves Cricut Companions Cuttlebug Set. Although there aren't borders in the set as such, I embossed down one side of the embossing folderand then turned the card around to emboss the other endto form a continuous border.Then applied it to the card.
Time to fill up the bowl!I added two pears which I had already coloured and glazed,before adding the lemons..I printed my sentiment out from my PC and cut it out using a scalloped edged circle Nestabilitie, and used a slightly larger Circle in Gold Mirror Card to matt the Sentiment onto before applying it to the project..So there you have it, another few of the pears used.. Thanks to Toni for the Home Decor/Recipe Cards ideas for more uses for the pears.. Watch this space! Enjoy your day, whatever you are up to... Thanks for checking us out, see you soon..
Andy.

Thursday 26 August 2010

The perfect pair!! PEAR

LONG POST ALERT!! Grab a cuppa, it's ganna be a long one, but oh so worth it!!
Hi Blogland, I have a friend who has just got engaged and is planning an engagement party in September.. For me September is Autumn, although with this global warming lark September can be as hot as mid July! I remember when I went back to school after the summer holidays, the leaves were falling off the trees, it was cold, it was wet!! pretty much like it has been in the UK for the past few days!! Hey, perhaps things are not so different now then!! Of course this is just a generalisation for us in the northern hemisphere, apologies for all our antipodean followers, you must be approaching Spring I guess??! Anyway, enough waffling..As their engagement is in September my card for them has an autumnal feel to it..
This week in our lessons here at Pinnacles we have been doing a technique called Iris Folding, NO! not folding a lady called Iris, although we do have a lady called Iris in our Wednesday Evening class, bet she got the shock of her life when she looked at the lesson sheet and saw this technique was coming up!! She still came to the lesson regardless, if a little apprehensively!!
For Iris Folding you need (a little old lady called Iris, folded in half and then half again!) NO! stop it!! You need a template of some sort,I chose a template of a pear which was cut from the Wall Decor & More Cricut Cartridge. And like with most templates you will use either the positive or negative image for your project,for the lesson, we used the negative image,which meant I was left with around 100 pears, of 50 pairs of pears!! Oh what to do with them, my first instinct was to bin them, but what a waste!! So I have incorporated them into a few projects.I took a couple of the images and coloured them with some Adirondack Ink (Lettuce)shading around the edgesto give dimension.I then added some Red Pepper ink to add more colour and shade, at first I though ooopps, too much,but they came our really well, almost good enough to eat!!You know me at the moment, if it stands sill long enough it's ganna get a blast of Glossy Accents!!Whilst the Pears were drying I took a piece of card stockand coloured it with the Lettuce Adirondack Ink,Embossed it through the Cuttlebug with one of the Embossing Folders from the Preserves Cricut Companions Cuttlebug Sets which matches this project perfectly I think. The idea behind the Cricut Companions is that they complement their respective Cricut Cartridges, but you don't need a Cricut to use them, they are Embossing Folders!....Once embossed, I went over the image again with the Lettuce,and then with Red Pepper, this project is sounding more and more like a Waldorf Salad recipe.. Lettuce, Red Pepper, Pears!! eeeekkk.I also randomly glazed some of the embossed images with Glossy Accents and put to one side to dry.I took this selection of Inksand randomly applied them to a White piece of card stock.
Punching out a border with one of the NEW EK Success large edger punches.
Glazed them, and put them by to dry.I printed my sentiment from my PC and coloured the paper with the Lettuce and Red Pepper Ink to tie the project together,cutting it out with a small Nestibilitie Circle and also cutting out a slightly larger circle in Gold Mirror Cardand layered the Two together, sorry photography is not my best skill!!I added a strip of card stock to my base card,attaching the now dry leaf border with foam pads and cutting it down to size..Matting my embossed piece of card onto some Gold Mirror card,before mounting it onto the final project.Adding the pears,and finally the sentiment.
Sorry for the long post! it took me 2 days to make the card (including drying time) and almost as long to write it up on here!! You've done well if you've got this far!! LOL. Hope this project gives you some inspiration for your Autumn crafting projects.. You still have time to win this Cricut Cartridge, so don't forget to leave a comment..
Thanks for checking us out, see you soon..
Andy.

Tuesday 24 August 2010

Leaves galore!!

Isn't galore a strange word, galore say it out load, what does it mean? Lots of! And today's project has lots and lots of leaves.. 80 to be precise.
Hi Blogland, you just never know when something is going to prove so popular! Just sitting in the shop at my new work area playing about with my Martha's, punches that is! and suddenly you're surrounded by inquisitive on lookers and a spur of the moment demo ensues..Here's the card I was making and a step by step.I punched a whole lot of leaves from some White Glitter Card using the Martha Stewart Branch Punch (M230367).Using the same Glitter Card I cut a Circle frame from the Plantin Schoolbook Cartridge using my Cricut, this was done at 5 1/4" using the Roly Poly function to achieve the cut out in the centre. For those with a Cricut Machine you could use the Centre Point function on any Cartridge which has a Circle to achieve a thicker or thinner circle frame, for those without a Cricut then any shape cutting system such as XCut will give you a similar effect.I used Pinflair Silicone Glue to attach my leaves. Firstly applying a decent amount of the glueand then adding the leaves,then more leaves,until I had gone all the way around the circle.I then went around with a second layer of leaves to give the wreath a fuller effect.Adding some gems to centre of each group of leaves.Whilst this was drying I prepared my base card. An 8"x8" White card with a matt of Silver Mirror Card, Yes that's me waving at you...Then a matt of Snow effect backing paper.I added Pinflair Glue to the back of the Circleto give the wreath some depth when it was added to the base card.I stamped my sentimentAnd applied an Image I had stamped, Coloured and glazed previously.
I think this is a great way to use this leaf punch, so much so I made a few more...
One in Champagne Gold
Adding an image cut from the Christmas/Noel Cricut Cartridge.
Chocolate BrownBlueBurgundy/RedGreen
And more Green

Not sure what I'm going to do with them yet, but they might give you some ideas. I have also done one in a Copper/Orange which would be great for Halloween or Thanksgiving, I'll pop it on here nearer the time..
Thanks for checking us out, and don't forget to leave a comment to be in with a chance to win the Independence Day Cricut cart...
See you soon.
Andy.