Monday, 21 November 2011

and the winners are......

Hi Everyone... First things first... Our Blog candy Winners are....... Jovan and Jenny...Jovan wins the Autumn Set of Tim Holtz Distress Inks and Jenny Wins the Winter set..Congratulations ladies, I hope you have fun using them when you receive them.
Thanks to everyone else for taking the time to enter. There will be plenty more chances to win some Blog candy in the very near future...Anyway, here we go with Today's project.. I've been very lucky to have been given one of Martha Stewart’s new Punch All Over the Page punches called Nordic Snowflake (M42-90006) to play with.. And this is what I came up with.. Not only a card but a candle holder too...I started off by punching my design onto some printed backing paper and trimming it to size.I then mounted the sheet onto some Acetate to give the flimsy paper some stability..Next, I made my stepper card using my Hougie Board, scoring the A4 Acetate sheet at 2", 4" and then manually folding the largest part of the sheet in half. The measurement for this fold should be 7 3/4", but as the Hougie Board does not measure in 1/4" this bit had to be done manually, which really was no big deal!I then added my punched image to the back of the stepper cardand some prepared Decoupage to the front step of the cardto add some dimension to the project...The fretwork which can be created with this punch seemed perfect for creating a Candle Holder.So, I punched out my design onto an A4 piece of patterned paper, trimming off the excess and then rolled it into a cylinder before placing it over my Candle..Pretty effective if I do say so myself...Great in other colours too to match your Christmas table setting perhaps..And how about this for a backing paper for all you Scrapbookers out there!!..All in all a pretty useful Punch...
Thanks for checking us out.
See you soon.
Andy.

Tuesday, 15 November 2011

Turkey fun and Blog Candy!!!

Hi Everyone... It's another Cuttlebug Blogspot challenge today... This week’s theme is Gobble, Gobble, Gobble... Do something fun with a Turkey... So hop on over to the Cuttlebug Blogspot to see what the other Design Team Members have come up with under this theme and why not take part in the challenge yourself...?Now, we don't really do Thanksgiving here in the UK, so my project is a Christmas Card.This image is a Digital Stamp; unfortunately I can't remember where I got it from, sorry! I coloured it using Copic Pens and then Glazed with Glossy Accents.Once it was dry I cut it out! Which was when....? The Glossy Accents cracked!! Ouch!! I guess that is one of the draw backs when I am using Digital Stamps. My printer does not take thick card stock, i.e. 290 or 225 gsm card stock, so I have to print on 160gsm max. As the Glossy Accents has Water in it, it makes the thinner card stock buckle a little.. Which, on this occasion caused the Glossy Accents to crack when I was cutting the image out. This is the first time this has happened, and guess it won't be the last!! Ho hum!!Whilst the image was drying I prepared my base card.I printed my sentiment from my PC onto White card stock, yes 160gsm card stock!!To tie the colour theme in with my project I coloured around the sentiment using Evergreen Bough and Iced Spruce Distress Inks which are part of the Winter 2011 Seasonal set of Distress Inks from Tim Holtz...
BLOG CANDY ALERT!!!!It's been a while since I gave away same Blog Candy! So, seeing as I have just passed my 200th post (Today’s post is 205) and also to celebrate 83,000 visits to our little Blog I think it's time to share some goodies with you all..
So, any comments left on this post "only" will go into the random draw to win either the Autumn (Fall) or Winter Set.. Just state your preference at the beginning of your comment to be in with a chance of winning.. Good Luck!! Entries close at midnight (UK time) on Friday 18th November 2011...The Autumn (FALL) set consists of Gathered Twigs, Ripe Persimmon and Seedless Preserves. And the Winter set consisis of Iced Spuce, Evergreen Bough and Festive Berries..
Anyway, back to the project..Once the card stock was coloured I cut around the sentiment using a die from Spellbinders Labels Four.Edging the shape using the NEW Green Metallic marker from Letraset to add a little bit of definition.Adding the sentiment plate to my card to finish it of...
Well, the brief was to do something fun with a Turkey! And let's face it, after a Turkey Christmas Dinner who wouldn't want to have a little snooozzzee to sleep it off!!
Thanks for checking us out.
See you soon..
Andy..

Friday, 11 November 2011

Keeping it simple...

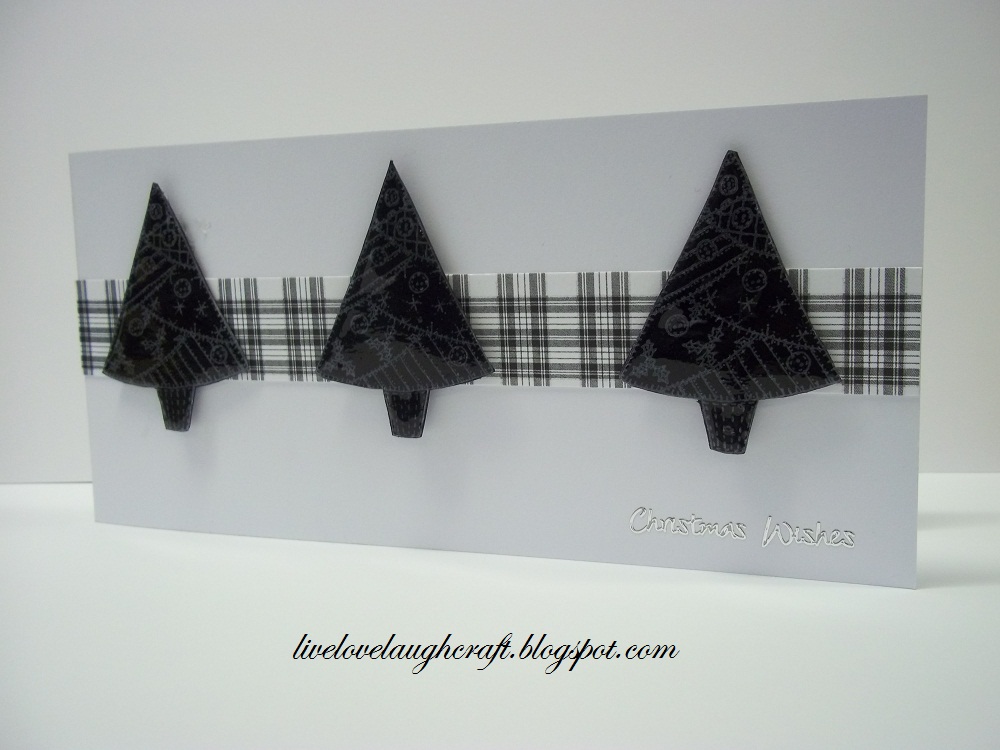
Hi Blogland... I just wanted to share with you a couple of very quick and simple cards I made recently..Apart from the drying time for the Glossy Accents they are very quick and simple to do.I started off by stamping my Tree image using Tuxedo Black Memento Ink.I then coloured parts of each image using my Cool Grey #1 Copic Pen and then glazed each tree with Glossy Accents.Once they were dry I cut them outand mounted them onto my base card to which I had added a strip of complementary "Tartan" card stockand a simple Peel Off..It was so effective on the White card stock that I just had to give it a go on Black card stock.This time stamping the image using Adirondack Snow Cap White Ink.Then glazing with Glossy Accents.Once dry they were cut outand then mounted onto my base card using the same "Tartan" card stock as I used on the White version.Both versions are quick, simple, elegant and very effective me thinks! Although the White one is probably my fave..
Have a great weekend everyone... and thanks for checking us out.
See you soon.
Andy.

Monday, 7 November 2011

Happy Birthday Sis...

Hi Everyone. I hope you had a good weekend? Yesterday was Joanne's (my Sister) Birthday. And here is the card I made for here...
It was an adaptation from a beautiful card that my Mum received for her Birthday back in September from Mrs Harrison (Pat)..Last week we received a delivery of the new Quilling Punches from EK Success and I was dying to give them a go, so using them on Joanne's card was the perfect opportunity to get them out of the packaging and have a play.I punched one of the designs out of Black and White card stock alternating the colours on each flower just to give a bit of diversity to the flowers... Take a look at this simple video to see how you can create effective flowers with these Punches.
I put the flowers to one side whilst I prepared my base card.I cut out some shapes using the Go Kreate Die XXL Square Frilly Frame #3 and matt and layered them together.Next, I cut out one of the Butterfly images from the Spellbinders Grand Dies Wonderful Wings FL-006. Although these are classed as Grand Die's, each image will fit through the Cuttlebug,Big Shot or Vagabond Machines quite comfortably as well as the Grand Calibur Machine..This was then added to my base card to which I had added the Go Kreate matt and layer and a Peel Off Sentiment..I then added my Quilled flowers.. I guess you can't go wrong with a Monochromatic card, but I felt that it needed just a little something extra to finish it off..Along with the new EK Success Quilling Punches we received the NEW Garland Punches and also the Layering Punches. Take a look at the videos to see these new products in action and with the Layering Punches how you get 3 Punches for the price of one!!So, once my Butterflies were punched out,I gave them a little bit of dimensionbefore attaching them to my project,which really finished it off for me!...
As for Joanne's Birthday present! You may recall last year I got her some Cinema tickets for the Harry Potter film and made it as part of her card. Well, if it ain't broke...So I did something similar this year. But this time for the new Twilight Film, Breaking Dawn pt1.. I have had this idea for ages; as soon as I saw the Immortal Love papers stack from DCWV. The papers in this stack were just made for this film.So, I cut a couple of the sheets down to size and made an easel card with them, printing her Cinema information inside...When I spoke to her on her Birthday she asked my where I had got it from! "Got it from"!! I made it!! Cheek of it!!And for all you Holly fans out there.. Here is the card that she sent Joanne... Yep, she knows how to lay on the cuteness! And is certainly growing up fast. She has now had all of her injections and a full M.O.T and is now allowed out into the big wide world!!
Anyway, thanks for checking us out and see you soon.
Andy.

Tuesday, 1 November 2011

Stamping & Embossing made easy.....

Hi Blogland.. Well, here we are in November already!! I probably don't have to tell you how fast this year has whizzed by!! and how fast Christmas is approaching!!With that in mind, here is another idea for you if you are struggling to get those Christmas cards made.. And if you haven't started yet.. "GET A MOVE ON!!".. Hands up who said back in January that you were going to make a few Christmas cards a week throughout the year, so that they were all made, written, enveloped, and sent out by the 1st of December? Yeah, me too!! Will that happen? What do you think?!
Today's project is part of my submission to the Cuttlebug Blogspot Design Team... Yes, that's right; the site is now back up and running.. So, hop on over to see what the other Design Team (DT) members have been up to. The theme this week is anything goes, so why not take part in the challenge.. Cos "BLOMMING ECK" the prizes for the winners are a-ma-zing!! If I could, I'd take part myself just to be in with a chance of winning one of the prizes on offer!!Anyway, back to today's project. I started off by opening my new Sizzix Stamp and Embossing Folder Holly Background Set (657769). This NEW range feature background stamps with co ordination embossing folders.Generally, you stamp your image firstand then line it up with the embossing folder and pass it through your embossing machine.The pattern around the shapes will be embossed which really adds definition and dimension to the project..I then matt and layered the image with Silver Mirror card and White Card stock adding some Clear Gems as the Berries of the Holly.I also made a smaller version to fill up space on my base card.I also punched a border in the Silver Mirror card using the Martha Stewart Snowflake Trim Punch (M42-70016)adding it and the embossed images to my base card along with a simple sentiment. Nice and Christmassy....
Thanks for checking us out, see you soon.
Andy.